Short answer: How to screen record on MacBook: press Shift-Command-5, choose Record Entire Screen or Record Selected Portion, then click Record. Use Options to choose a save location, timer, microphone, and whether to show mouse clicks. Stop recording from the menu bar when finished.
That answers the device question, but it does not solve the knowledge problem. MacBook users can record a meeting, course, product demo, webinar, or interview in seconds. The harder part comes later: finding one key moment, writing the summary, extracting tasks, and sharing the follow-up without making everyone watch a long video file.
For knowledge work, the recording is rarely the final asset. The real value is the transcript, decisions, questions, action items, examples, and reusable notes inside the recording. That is where HiNoter fits: upload a MacBook recording to generate a transcript, summary, action items, and a mind map, or let HiNoter auto-join scheduled meetings so you can skip manual recording and note-taking entirely.
Before You Record: Pick the Right Mac Tool
Modern Macs include a built-in Screenshot toolbar for screen recording. Apple documents the shortcut as Shift-Command-5. The toolbar lets you record the entire screen or a selected portion of the screen, and the Options menu gives you controls for save location, microphone, timer, and related capture settings.
QuickTime Player can still be useful if you are used to that workflow. Apple says you can open QuickTime Player, choose File, then New Screen Recording. On current macOS versions, that command opens the same Screenshot toolbar. In other words, QuickTime is a familiar doorway, while Shift-Command-5 is the fastest path.
Before recording work content, check permission and privacy. Screen recordings can capture names, calendar details, chat messages, confidential documents, customer information, and browser tabs. If you are recording other people in a meeting, class, interview, or customer session, follow your organization, school, or event policy and tell participants when appropriate.
How to Screen Record on MacBook With Shift-Command-5
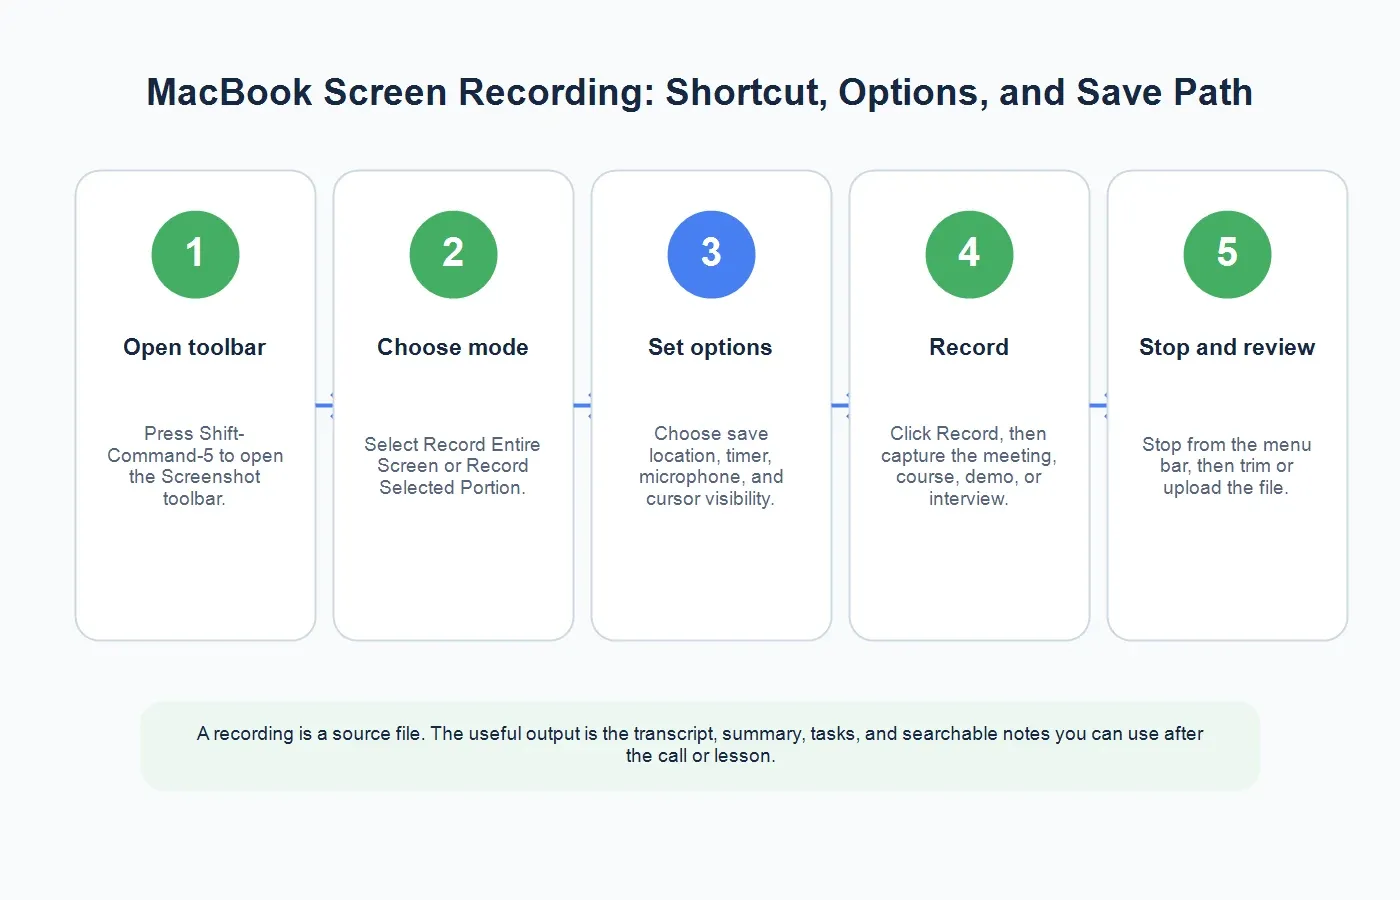
The built-in Screenshot toolbar is the cleanest way to record on a MacBook. It is quick, does not require extra software, and gives enough control for most classes, product demos, webinars, and lightweight meetings.
1. Open the Screenshot Toolbar
Press Shift-Command-5. A small toolbar appears near the bottom of the screen. You will see screenshot options and screen recording options. If nothing appears, check whether another shortcut manager or managed device policy is interfering, then try opening Screenshot from Launchpad or Spotlight.
2. Choose Entire Screen or Selected Portion
Select Record Entire Screen if you need to capture everything happening on the display. This is useful for lessons, webinars, and workflows that move between browser tabs, slides, and notes. It is also riskier because it may include notifications or private windows.
Select Record Selected Portion if you only need a window, slide area, browser app, or demo region. This is often the better choice for tutorials and product walkthroughs because it keeps the viewer focused and reduces accidental exposure of private information.
3. Open Options Before Recording
Click Options before you start. You can choose where the file saves, whether to use a timer, which microphone to use, and whether to show mouse clicks. For repeat workflows, set a predictable save location such as Desktop, Documents, or a dedicated Recordings folder.
Microphone choice is especially important. If you are narrating a demo, choose the built-in microphone or an external microphone. If you are recording a meeting, remember that macOS screen recording may not capture every app's internal audio the way users expect. Test a short sample before recording an important session.
4. Click Record
Click Record. If you selected a portion of the screen, adjust the selection box first so it excludes private tabs and unused space. Give yourself a short pause before you begin speaking. That pause makes the beginning of the recording easier to trim and gives AI transcription a cleaner start.
5. Stop the Recording
When finished, click the Stop Recording button in the menu bar. After you stop, macOS shows a thumbnail in the corner. You can click it to preview, trim, share, or save the file. If you do nothing, the recording saves to the location you selected in Options.
How to Screen Record on MacBook With QuickTime Player
QuickTime Player is a helpful fallback when someone remembers older Mac instructions. Open QuickTime Player, choose File, then New Screen Recording. On recent macOS versions, Apple says this opens the Screenshot toolbar, where you can choose the recording area and options.
Use QuickTime if you are already working inside the app, need a familiar menu-based path, or are helping someone who does not remember the keyboard shortcut. For most users, Shift-Command-5 is faster and easier to teach.
Audio Caveats: What MacBook Screen Recording Captures
Audio is where many MacBook recordings go wrong. A beautiful screen recording is not useful for AI notes if the speech is missing or muffled. Before recording a long meeting or course, create a 10-second test clip and play it back.
Use the microphone option if you need your own narration. Speak clearly, reduce background noise, and use an external microphone if the built-in microphone sounds distant. If you are recording a browser-based course or webinar, check whether the recording captures the sound you need. Different apps, permissions, and audio setups can behave differently.
For team meetings, recording the screen is not always the best route. A meeting recording may miss speaker identity, chat context, or internal audio depending on the setup. If the goal is notes rather than video evidence, an AI meeting assistant can be cleaner. HiNoter can auto-join scheduled meetings, capture the conversation, and produce notes without someone manually running a screen recording.
A Pre-Recording Checklist for Better AI Notes
The quality of the AI notes depends on the quality of the source recording. Before you record a long course, meeting, demo, or interview, take one minute to prepare the screen and audio. This small habit prevents the two most common failures: missing sound and too much visual clutter.
Close private browser tabs, messaging apps, password managers, and unrelated documents. Turn on Do Not Disturb or Focus so notifications do not appear in the recording. If you are using selected-portion recording, frame only the part of the screen that matters. If you are recording slides, increase the zoom enough that text will be readable later. If you are recording a product demo, keep the cursor movement deliberate and avoid switching windows unless the workflow requires it.
For speech, use a quiet room and choose the correct microphone in Options. If multiple people are speaking, ask them to speak one at a time when possible. Start the recording with a short verbal label such as, "This is the onboarding demo for the analytics dashboard." That opening sentence gives the transcript and summary a clean context. At the end, say the follow-up out loud: "The next step is to send the revised proposal by Thursday." Clear spoken commitments become much easier to extract as action items.
When to Record Manually and When to Let HiNoter Join
Manual screen recording is useful when the visual activity matters: a product walkthrough, a design review, a course explanation, a webinar, or an interview where the shared screen carries important context. It gives you a replayable source file and preserves what happened visually.
For scheduled meetings, manual recording is often less reliable. Someone has to remember to start, select the right area, check audio, stop the recording, find the file, and share it. If the goal is a useful meeting record rather than a video, HiNoter's automatic meeting workflow is usually simpler. Connect your calendar, let HiNoter join the meeting, and receive structured notes, summaries, action items, and source-linked answers without asking one attendee to become the note-taker.
A practical rule is this: record your MacBook screen when the screen itself is the subject. Use HiNoter as the meeting assistant when the conversation is the subject. In both cases, the final goal is the same: turn what happened into searchable knowledge that people can use later.
Where MacBook Screen Recordings Save
Apple's Screenshot toolbar lets you choose the save location in Options. Common locations include Desktop, Documents, Clipboard, Mail, Messages, Preview, or another folder. If you do not remember where a recording went, check the location selected in Options and search Finder for recent movie files.
For recurring work, do not rely on a crowded Desktop. Create folders by use case: Course Recordings, Customer Demos, Interviews, Webinars, or Meeting Clips. Clear file names make the later AI workflow easier. A file called "product-demo-onboarding-july-7" is much more useful than an untitled screen recording.
How to Trim a MacBook Screen Recording
After you stop recording, click the thumbnail that appears in the corner. Apple lets you trim from the preview interface before saving. You can also open the file later in QuickTime Player and use Trim from the Edit menu.
Trim dead air at the beginning, setup time, accidental pauses, and the end of the call if it contains private after-talk. Do not over-edit if the recording is being used as a source record. For AI notes, clean audio and clear context matter more than polished video cuts.
Turn a MacBook Recording Into AI Notes
The recording proves what happened. The notes help people use what happened. A 45-minute video is a poor follow-up format for most teams. A transcript, summary, task list, and mind map are much easier to scan, share, and search.
1. Upload the Recording to HiNoter
Upload the approved MacBook recording to HiNoter's audio to text workflow. Use recordings you are allowed to process, especially when they include customer data, student information, confidential meetings, or interview participants.
2. Generate a Transcript
A transcript makes the recording searchable. Instead of replaying the whole file, you can search for a phrase, speaker cue, objection, feature request, or course topic. For teams that handle demos, interviews, and customer calls, this saves the most time.
3. Review the Summary
HiNoter can turn long recordings into structured summaries. A good summary tells you why the recording matters, what was discussed, what changed, what questions remain, and what should happen next. That is more useful than a video link dropped into chat with no context.
4. Extract Action Items
Meetings, demos, and interviews often contain tasks that are easy to miss: send the deck, follow up with a candidate, test a bug, confirm a requirement, or share a course resource. HiNoter can surface action items so the recording becomes a working record instead of an archive.
5. Create a Mind Map
A mind map helps when the recording covers multiple themes. Students can use it to organize a lecture. Product teams can map customer pain points and feature requests. Researchers can group interview themes before writing a synthesis.
6. Ask Questions With Source References
HiNoter's AI Chat lets you ask questions about your notes and trace answers back to source references. That matters when the recording becomes part of a knowledge base. You can ask, "What did the customer say about onboarding?" or "Which assignment deadline did the instructor mention?" without scrubbing the timeline.
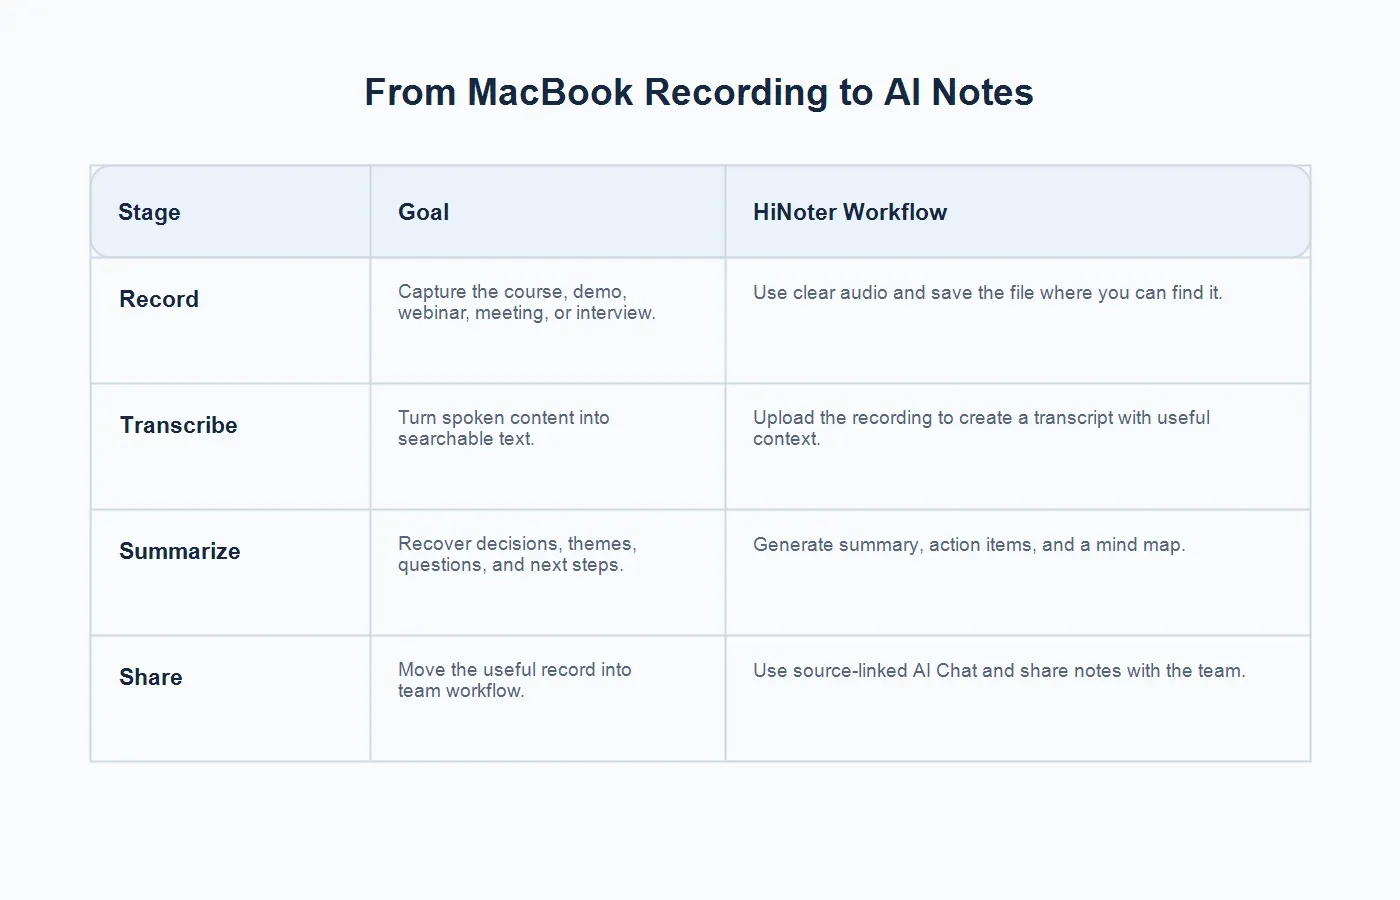
Record, Transcribe, Summarize, Share
The cleanest workflow is not to record more files. It is to turn the right recordings into useful knowledge.
| Stage | Goal | HiNoter Workflow |
|---|---|---|
| Record | Capture a meeting, course, demo, webinar, or interview. | Use clear audio and save the file where you can find it. |
| Transcribe | Turn spoken content into searchable text. | Upload the recording to generate a transcript. |
| Summarize | Recover decisions, themes, questions, and next steps. | Generate a summary, action items, and a mind map. |
| Share | Move the useful record into team workflow. | Use source-linked AI Chat and share notes with the team. |
Best Use Cases for MacBook Screen Recording
Meetings
Recordings can help when you need visual context from slides, dashboards, or product walkthroughs. But if your goal is meeting notes, HiNoter's AI meeting notes workflow is usually better than manual screen recording. Letting HiNoter auto-join meetings reduces the chance that someone forgets to press Record.
Courses and Training
Students and learners often need the explanation, not the entire video. A transcript and summary make review easier. A mind map helps connect concepts and prepare for exams, quizzes, or project work.
Product Demos
Product, sales, and success teams can record demos to preserve customer language, workflow friction, objections, and requested improvements. The AI notes become a cleaner handoff to product managers, support leads, and account teams.
Interviews and Research
Interview recordings need careful permission handling. When recording is allowed, a transcript and source-linked notes make it easier to find accurate quotes, compare participants, and identify themes without relying on memory.
Troubleshooting MacBook Screen Recording
Shift-Command-5 Does Not Open
Try opening Screenshot from Spotlight or Launchpad. If the MacBook is managed by an employer or school, an administrator may restrict screen recording. Restarting the Mac can also clear temporary shortcut conflicts.
The Recording Has No Audio
Open Options before recording and choose the correct microphone. Test a short clip before recording something important. If you need audio from another app, check that app's settings and permissions, because system audio capture can vary by setup.
The File Is Too Large
Record only the selected portion when possible, close unnecessary motion-heavy windows, and stop between topics. For long files, upload the recording to HiNoter and use the transcript and summary instead of replaying the entire video.
You Recorded Private Information
Trim the file if appropriate, restrict access, and follow your organization's privacy process. Before future recordings, turn off notifications, close private tabs, and use selected-portion recording to limit what appears on screen.
Final Takeaway
Learning how to screen record on MacBook is simple: press Shift-Command-5, choose the recording area, set options, and click Record. The more important habit is what you do afterward. A recording is evidence. AI notes are the working record that helps people find the key moments, understand decisions, and follow through.
Upload MacBook recordings to HiNoter to turn them into transcripts, summaries, action items, mind maps, and source-linked AI Chat. For scheduled meetings, connect HiNoter as an AI meeting assistant so it can auto-join and create notes without manual recording.
FAQs
What is the shortcut to screen record on MacBook?
Press Shift-Command-5 to open the Screenshot toolbar. Choose Record Entire Screen or Record Selected Portion, then click Record.
Can I screen record on MacBook with audio?
Yes, you can choose a microphone from Options before recording. If you need app or system audio, test first because capture behavior can vary by app, permissions, and setup.
Where do MacBook screen recordings save?
The save location is controlled by Options in the Screenshot toolbar. You can choose Desktop, Documents, Clipboard, or another folder.
Can QuickTime record my MacBook screen?
Yes. In QuickTime Player, choose File, then New Screen Recording. On current macOS versions, this opens the Screenshot toolbar.
Can HiNoter summarize a MacBook screen recording?
Yes. Upload an approved recording to HiNoter to generate a transcript, summary, action items, mind map, and source-linked AI Chat answers.