How to Record a Zoom Meeting (Host, Participant, Free)
A complete guide to local recording, cloud recording, participant permissions, free-plan options, audio quality, transcripts, privacy notices, and post-meeting workflows.
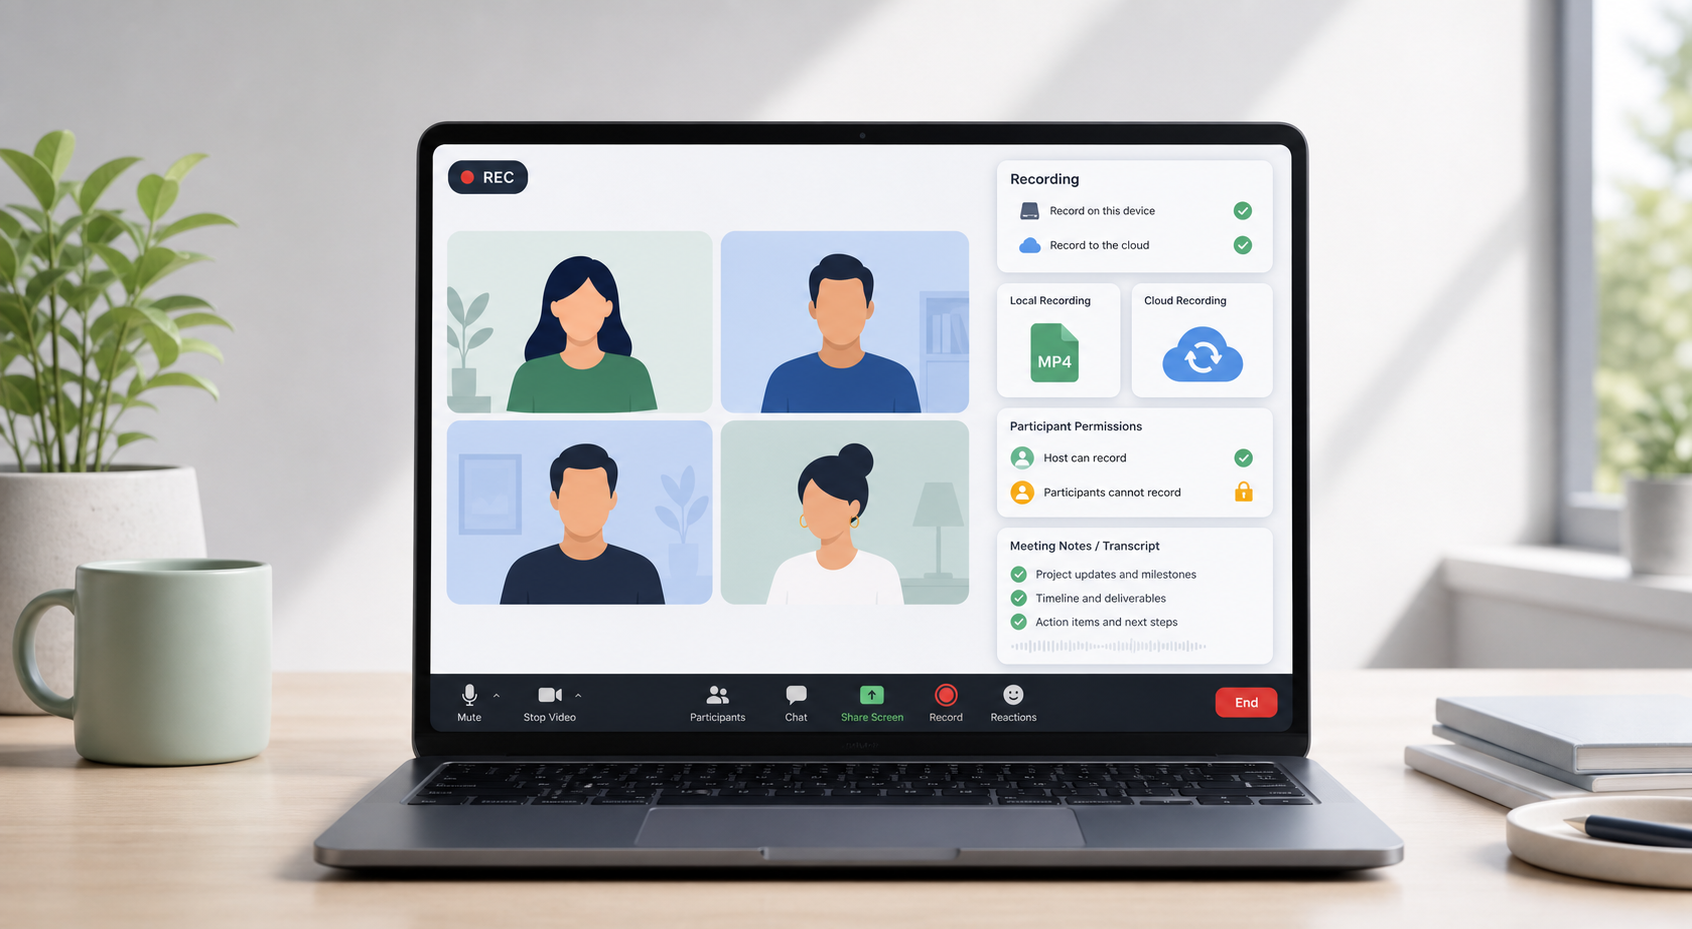
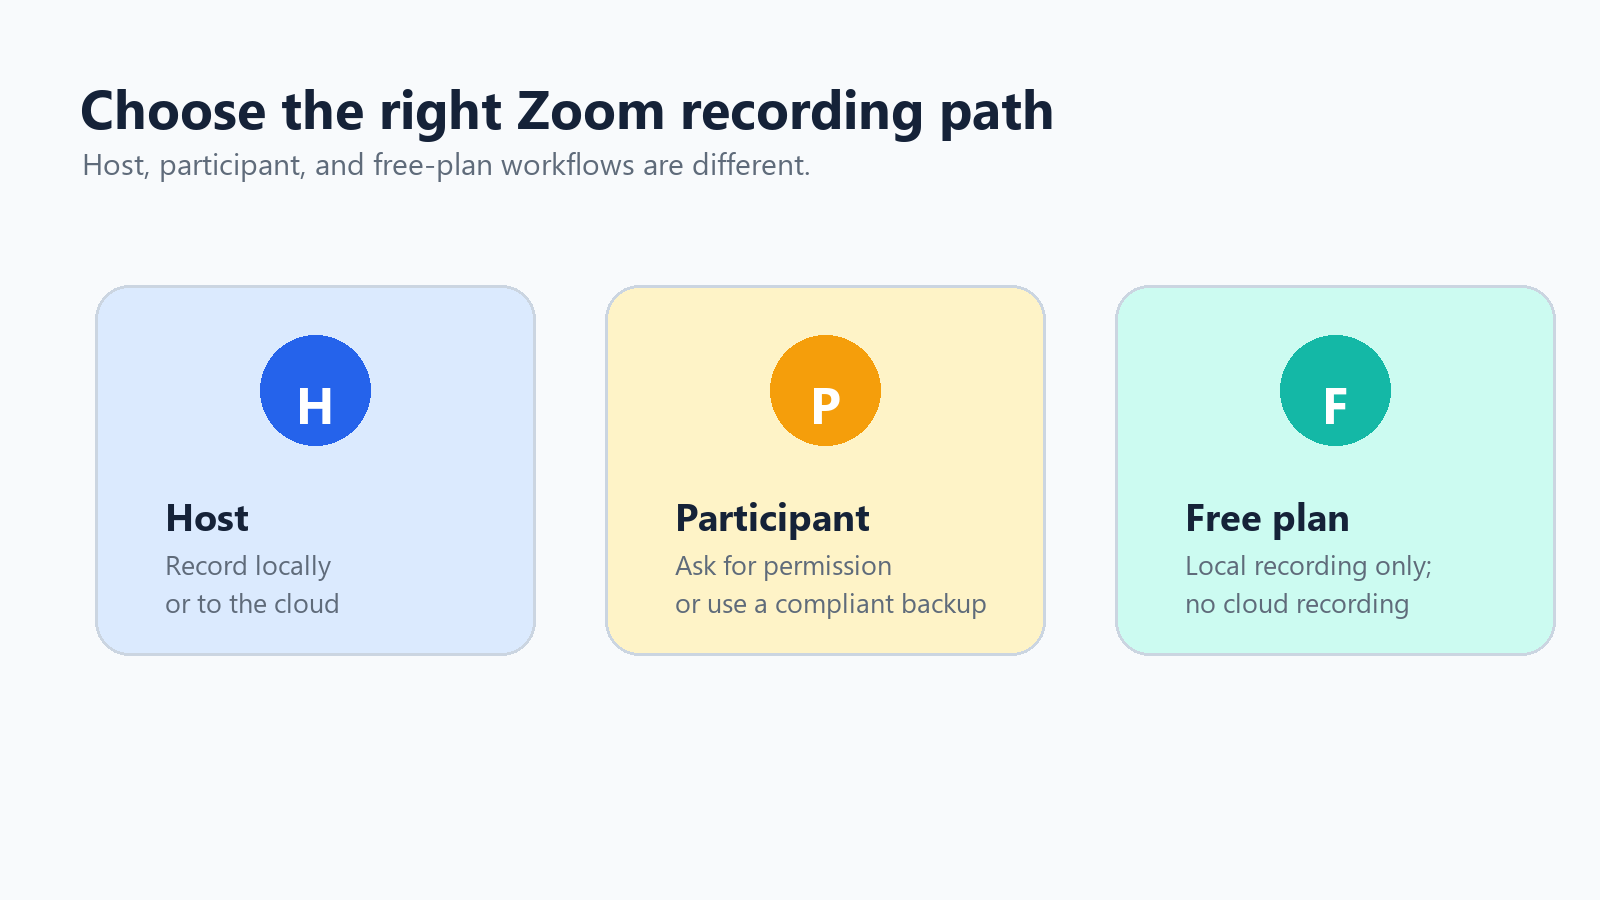
If you need to know how to record a Zoom meeting, the right method depends on your role. Hosts can record locally or to the cloud if their account supports it. Participants need the host's permission to record inside Zoom. Free users can record to their computer, but they do not get Zoom cloud recording.
That role distinction saves a lot of frustration. Most recording problems are not technical at first: the Record button is missing, the host never granted permission, the recording saved somewhere unexpected, or the team assumed cloud recording was available on a free account. This guide walks through each situation with practical steps and a privacy-first mindset.
Reference: Zoom Support states that computer recordings are available with all Zoom accounts, while cloud recordings are available with paid accounts and stored in the Zoom cloud. Source
Quick role map If you are the host, use Zoom's built-in local or cloud recording. If you are a participant, ask the host to grant local recording permission or use an approved note-taking workflow. If you use Zoom Free, record locally or use a compliant screen recorder when appropriate. |
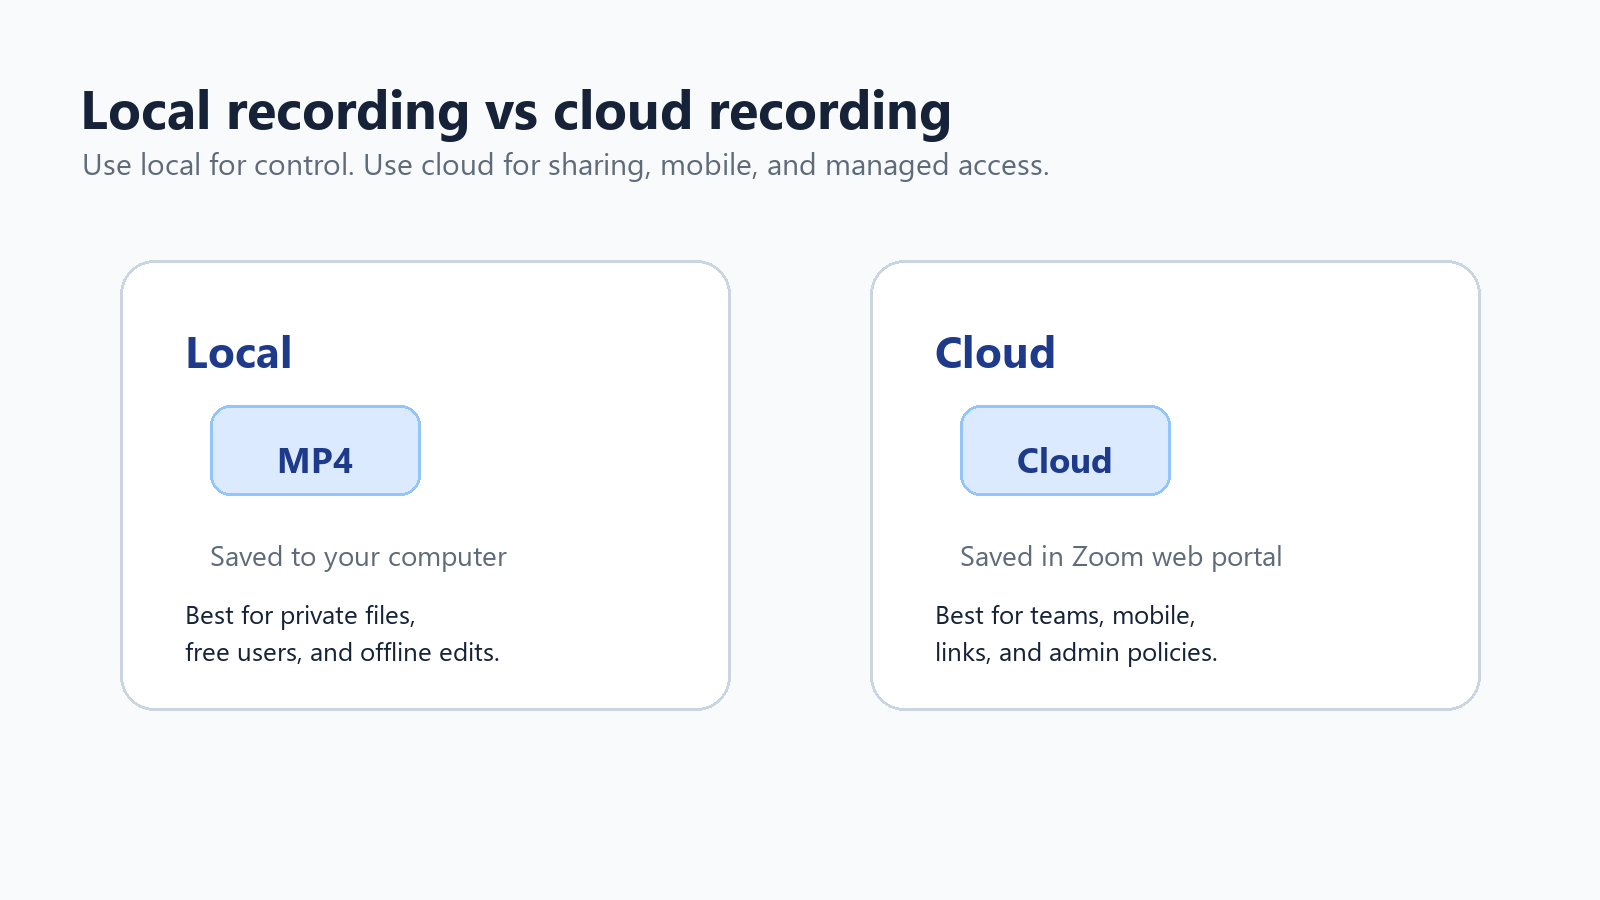
Local Recording vs Zoom Cloud Recording
Before touching the Record button, decide whether the meeting should be saved on your computer or in Zoom's cloud. Both can create standard recording files, but they solve different problems.
Feature | Local recording | Cloud recording |
Availability | Available to free and paid Zoom users on desktop. | Available to licensed users on paid Zoom accounts when enabled. |
Where files live | On the recorder's computer, usually in Documents > Zoom by default. | In the Zoom web portal under recordings, with links for viewing, sharing, and downloading. |
Best for | Private files, free users, offline editing, and people who want direct file control. | Team sharing, mobile recording, admin access controls, cloud transcripts, and managed retention. |
Common formats | MP4 video, M4A audio, and chat text files. | MP4 video, M4A audio, chat text, captions, and transcript files when features are enabled. |
Main risk | Files can be lost, too large, or stuck on one person's laptop. | Storage limits, sharing permissions, and account policy settings can block access. |
Reference: Zoom Support lists MP4, M4A, TXT, CC.VTT, and VTT recording file formats, and notes approximate storage usage of 20 MB per hour for screen sharing and 200 MB per hour for video. Source
Part 1: How to Record a Zoom Meeting as the Host
How to Start a Local Zoom Recording
Local recording is the safest default when you want a simple MP4 and do not need cloud sharing. It is also the route free Zoom users should learn first.
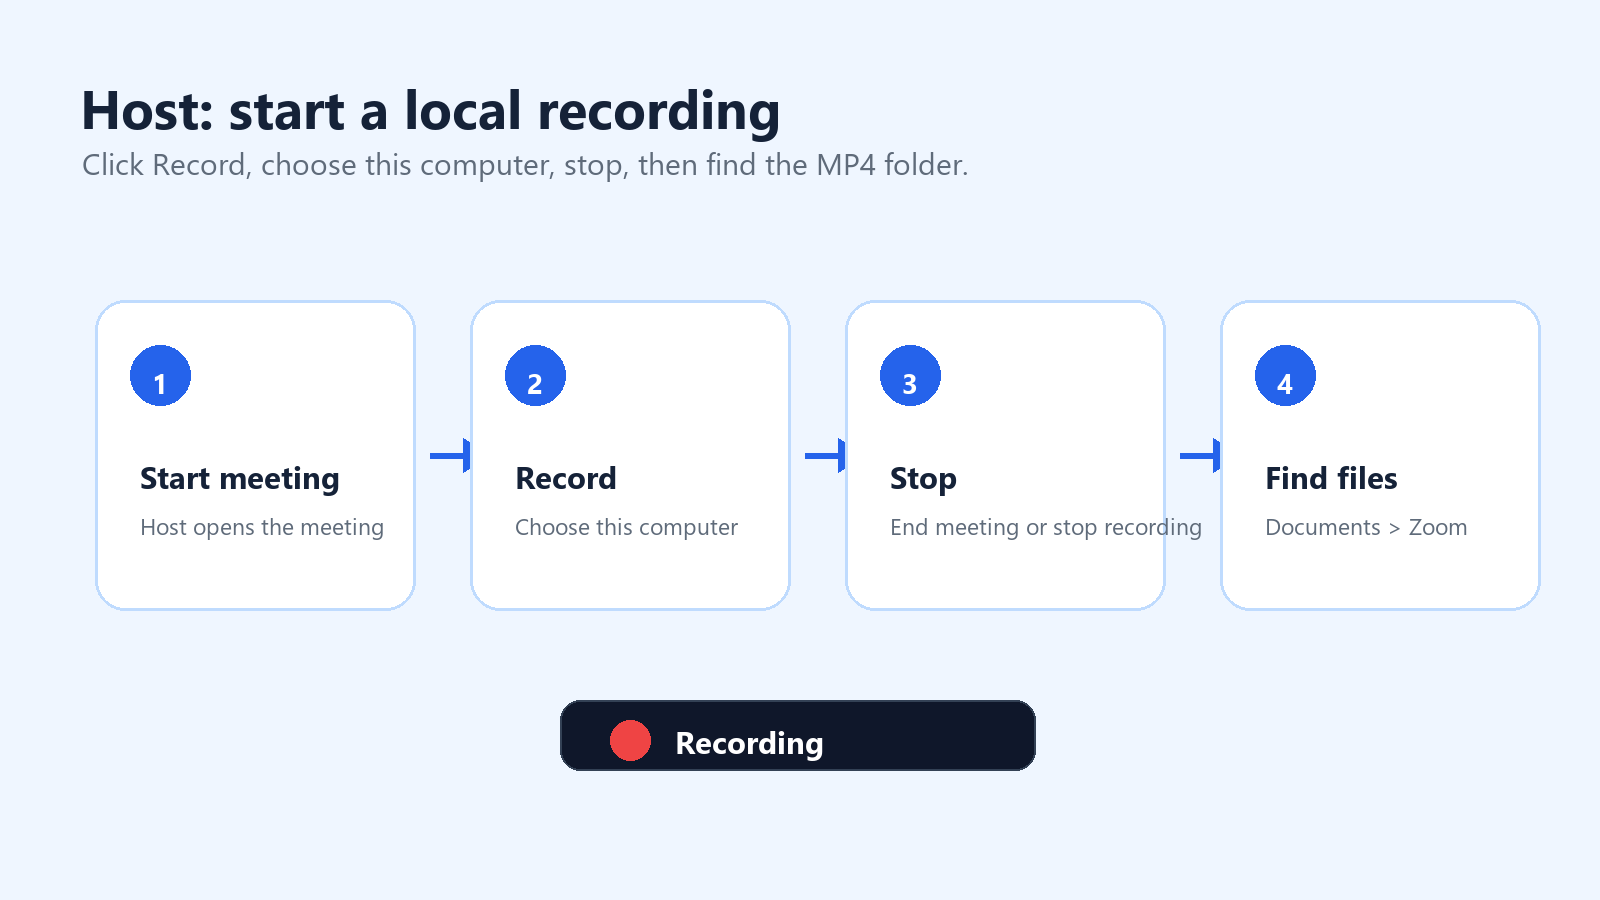
Start or join the Zoom meeting as the host.
Click Record in the meeting controls. If cloud recording is enabled, choose Record to this Computer.
Look for the recording indicator in the upper-left corner of the Zoom window.
Use Pause if you want to skip a break without ending the recording segment.
Click Stop Recording when finished, or end the meeting.
Wait while Zoom converts the recording. Do not shut down the computer during conversion.
Open the converted folder. By default, Zoom computer recordings are stored in the Documents folder in a folder named Zoom.
If you cannot find the recording, open the Zoom desktop app, go to Meetings, then Recorded. You can also check Settings > Recording to see or change the local recording location. On shared office computers, confirm the recording folder before the meeting begins.
What Local Recording Captures
A local recording captures the meeting as the recorder sees it. That detail matters. If you are in speaker view, the recording follows speaker view. If you want the shared screen to dominate the recording, switch your layout before and during the screen share. For interviews or webinars, test gallery view, speaker view, and shared-screen layouts before the real meeting.
Use speaker view for interviews and executive briefings.
Use shared-screen view for demos, trainings, and walkthroughs.
Use gallery view only when participant reactions matter.
Enable separate audio tracks when you need cleaner editing by speaker.
Keep the Zoom window visible if you are also using screen recording software.
How to Start a Zoom Cloud Recording
Cloud recording is built for sharing and administration. Zoom Support says cloud recording is available to licensed users on Pro, Business, or Enterprise accounts when cloud recording is enabled. Only hosts and co-hosts can start a cloud recording; if a participant needs to record, the host can make them a co-host or use local recording permission instead.
Sign in to the Zoom desktop or mobile app with a licensed account.
Start the meeting as host or co-host.
Click Record in the meeting controls.
Choose Record to the Cloud.
Stop the recording or end the meeting.
Wait for Zoom to process the cloud files.
Open the Zoom web portal and go to Recordings to view, download, share, or adjust access settings.
Reference: Zoom Support, 'Starting a cloud recording.' Source
How to Share a Zoom Cloud Recording
After processing, Zoom cloud recordings can be streamed in a browser, downloaded, or shared by link depending on account settings. For sensitive meetings, do not copy the link into a large Slack channel by default. Check passcode, authentication, expiration, download permission, and transcript visibility before sharing.
Use authenticated viewing for internal-only recordings.
Use a passcode when the link may travel outside the original group.
Turn off downloads if people only need to watch.
Set an expiration date for temporary projects.
Delete or archive old recordings before storage limits become a blocker.
How to Set Automatic Recording So You Do Not Forget
For recurring customer calls, webinars, user interviews, or training sessions, automatic recording prevents the classic post-meeting realization: nobody clicked Record. In the Zoom web portal, hosts and admins can enable automatic recording under the Recording settings area. Depending on the account, the recording can start locally or in the cloud.
Use automatic recording selectively Automatic recording is helpful for planned sessions, but it is risky for sensitive conversations. Add a recording notice to the calendar invite, confirm consent at the start, and pause or stop recording when the conversation moves into private or irrelevant topics. |
Part 2: How to Record a Zoom Meeting as a Participant
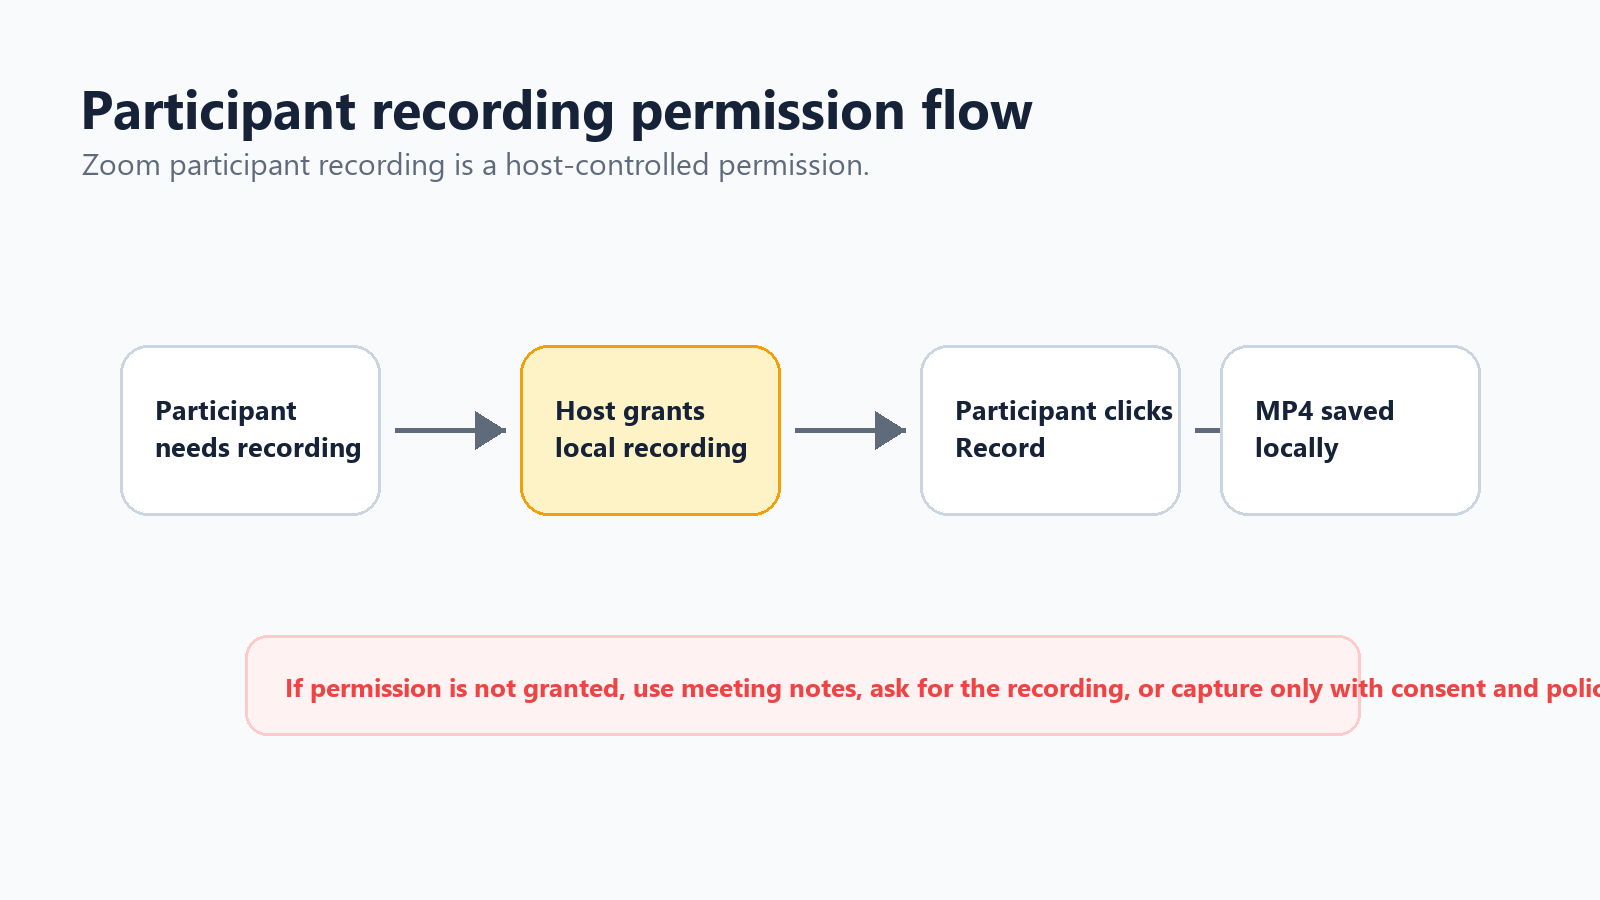
Participants often search for this because they do not want to interrupt the meeting or imply distrust. The clean answer is still permission-based: a participant needs the host to grant local recording permission in Zoom, or the participant should use an approved alternative such as meeting notes, an authorized AI note taker, or a compliant screen recording workflow.
How to Ask the Host for Recording Permission
A low-friction request keeps the tone professional. You are not asking because you distrust anyone; you are asking because you want accurate follow-up.
Participant request template Would it be okay if I record locally for my notes? I will use it only to confirm action items and can delete it after the summary is sent. |
If the host approves, they can open the participants panel, select your name, and allow local recording. Once granted, your Record button should become available.
What If the Host Does Not Grant Permission?
Do not try to secretly record a Zoom meeting. Beyond the trust issue, meeting recordings can include personal data, confidential business information, trade secrets, customer details, and regulated information. A better path is to ask for the host's recording afterward, take structured notes, or use a meeting assistant only when the meeting owner and participants are aware.
Ask the host to share the official recording or transcript after the meeting.
Ask whether an AI note taker can join the call for summary and action items.
Take manual notes focused on decisions, owners, due dates, and unresolved questions.
If policy allows screen recording, disclose it and capture only what you need.
For customer or legal conversations, follow company policy before recording anything.
Using a Screen Recorder as a Backup
If you are allowed to record but Zoom will not grant in-app recording permission, a screen recorder can capture your screen and audio. On Windows, you might use a built-in capture tool or OBS. On macOS, QuickTime can record the screen, though internal audio may require extra setup. On Chromebook, the built-in Screen Capture tool can work for basic recording. The important rule is the same: get consent and test audio before the real meeting.
Part 3: How Free Zoom Users Can Record Meetings
Zoom Free users can record locally on the desktop app, but they do not get Zoom cloud recording. That means the MP4 is your responsibility: storage, backup, sharing, and deletion all happen outside Zoom's cloud recording workflow.
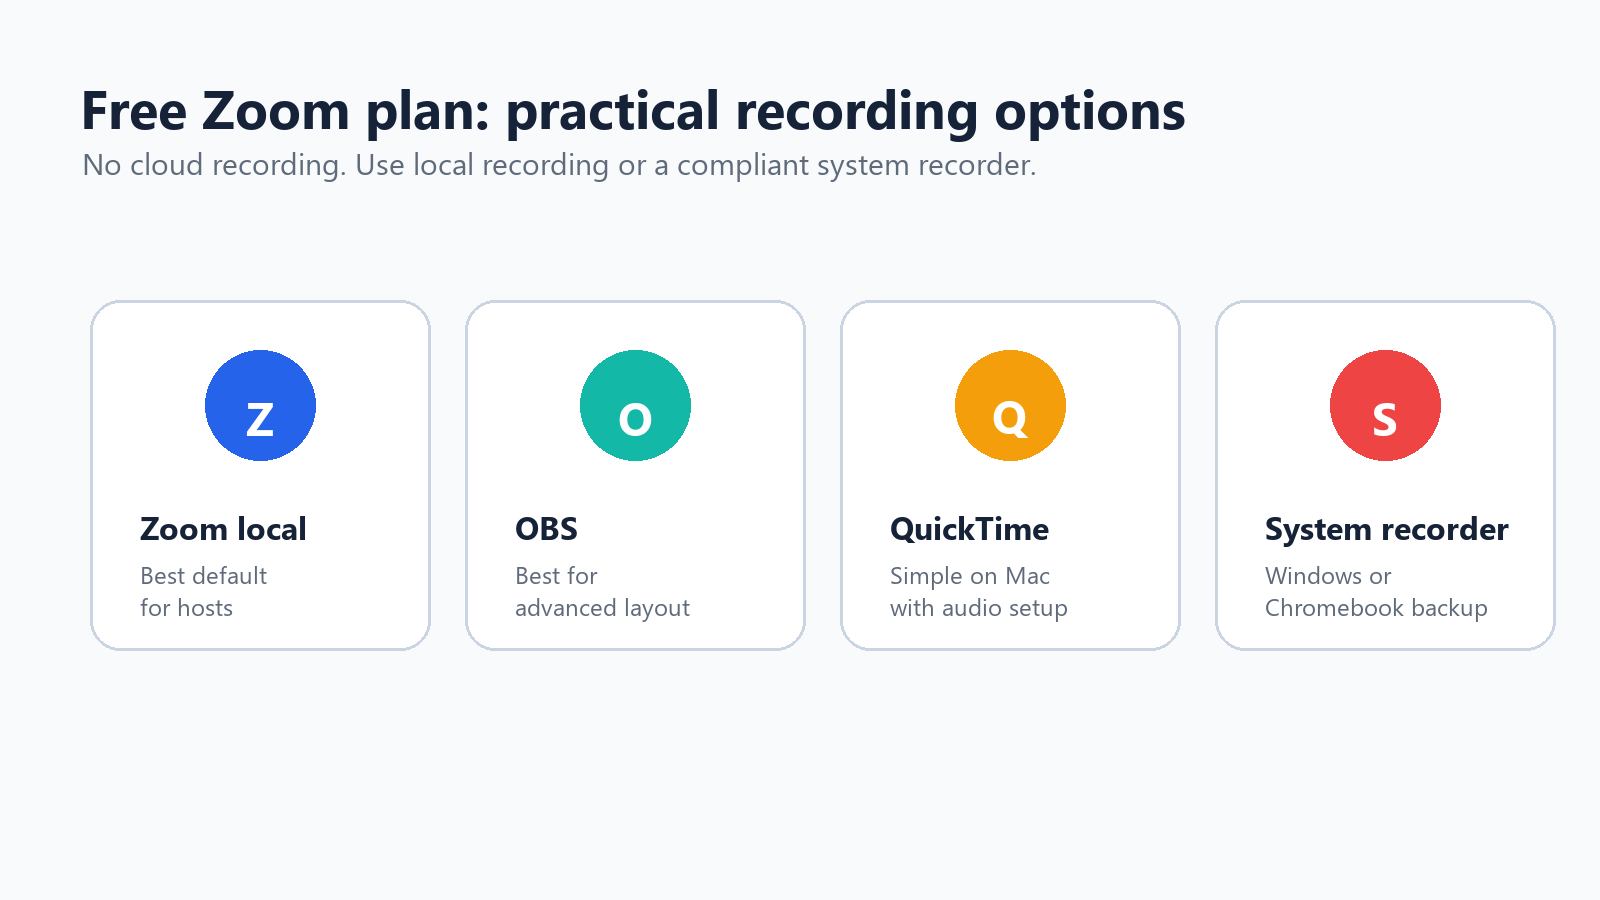
Use Zoom local recording when you are the host on desktop.
Use OBS when you need scenes, overlays, or more control over screen and audio sources.
Use QuickTime on Mac for a simple screen capture, then verify the audio setup.
Use Windows, Chromebook, or macOS system screen recording tools when Zoom recording is not available but recording is approved.
Use cloud storage such as Google Drive, Dropbox, or OneDrive to share the final MP4 instead of emailing huge files.
Free-plan users should be extra careful about file naming. A good pattern is date, client or project, meeting topic, and version: 2026-07-01-client-demo-recording-v1.mp4. That makes old recordings easier to find and delete later.
Part 4: Recording Settings That Improve Quality
A 60-Second Pre-Recording Checklist
The best way to avoid recording failure is not a better recovery trick; it is a short checklist before the meeting starts. For any meeting that matters, assign one person as the recording owner. That person is responsible for confirming the setting, starting the recording, watching the red indicator, and making sure the file processes before everyone walks away.
Confirm who owns the recording before the meeting begins.
Say the recording notice out loud and wait for objections.
Check whether you need local recording, cloud recording, or both.
Confirm that the shared screen layout is the one you want recorded.
Ask the main speaker to use a microphone or headphones.
Close private tabs, messages, documents, and notifications.
Start the recording before the first decision is discussed.
Put a note in the agenda that says: Recording owner confirms file after the meeting.
Video Resolution and Layout
Do not chase the highest possible resolution if the purpose is meeting documentation. A clear shared screen and clean audio matter more than a huge file. For screen-sharing sessions, ask presenters to zoom in before they explain fine details. For demos, close distracting windows and keep the shared app full size.
For product demos, record the shared screen layout.
For interviews, use speaker view and a stable microphone.
For training, record in shorter segments so editing is easier.
For webinars, consider cloud recording if you need links, multiple layouts, and centralized storage.
Audio Quality and Speaker Identification
The transcript and summary are only as good as the audio. Ask participants to use headphones, avoid laptop fans, mute when not speaking, and say their name before a long comment when the group is large. If you plan to edit, enable separate audio tracks in local recording settings where available.
Use an external microphone for hosts and presenters.
Ask participants to mute while not speaking.
Record a 20-second test for important interviews.
Enable separate audio files if you will clean up audio later.
Repeat critical decisions aloud before moving on.
Recording Shared Screens Correctly
If you only recorded your own video tile while someone else was presenting, the issue is usually layout. Zoom records what the recording path is configured to capture. Before the meeting, test the layout you care about: active speaker with shared screen, shared screen with speaker thumbnail, or gallery view. During a live demo, keep the shared content in focus and avoid switching windows unless that is part of the lesson.
Recommended Settings by Meeting Type
Meeting type | Recommended recording setup | Why it works |
Customer discovery call | Cloud recording with consent, transcript, and restricted sharing. | You need searchable quotes, context, and follow-up, but access should stay limited. |
Internal standup | Skip video recording; use structured notes or an AI summary. | A full recording is usually too heavy for routine status updates. |
Product demo | Record shared screen with microphone audio and speaker thumbnail. | Viewers need to see the workflow and hear the explanation. |
Training session | Cloud recording plus transcript and chapter-style notes. | New hires or customers can revisit the lesson without asking the trainer. |
Interview | Speaker view, high-quality microphone, and clear consent at the start. | Audio clarity and trust matter more than complex video layout. |
Webinar | Cloud recording, chat saved, transcript enabled, and storage planned. | Large audiences need a controlled replay link and searchable archive. |
Part 5: What to Do After the Zoom Recording
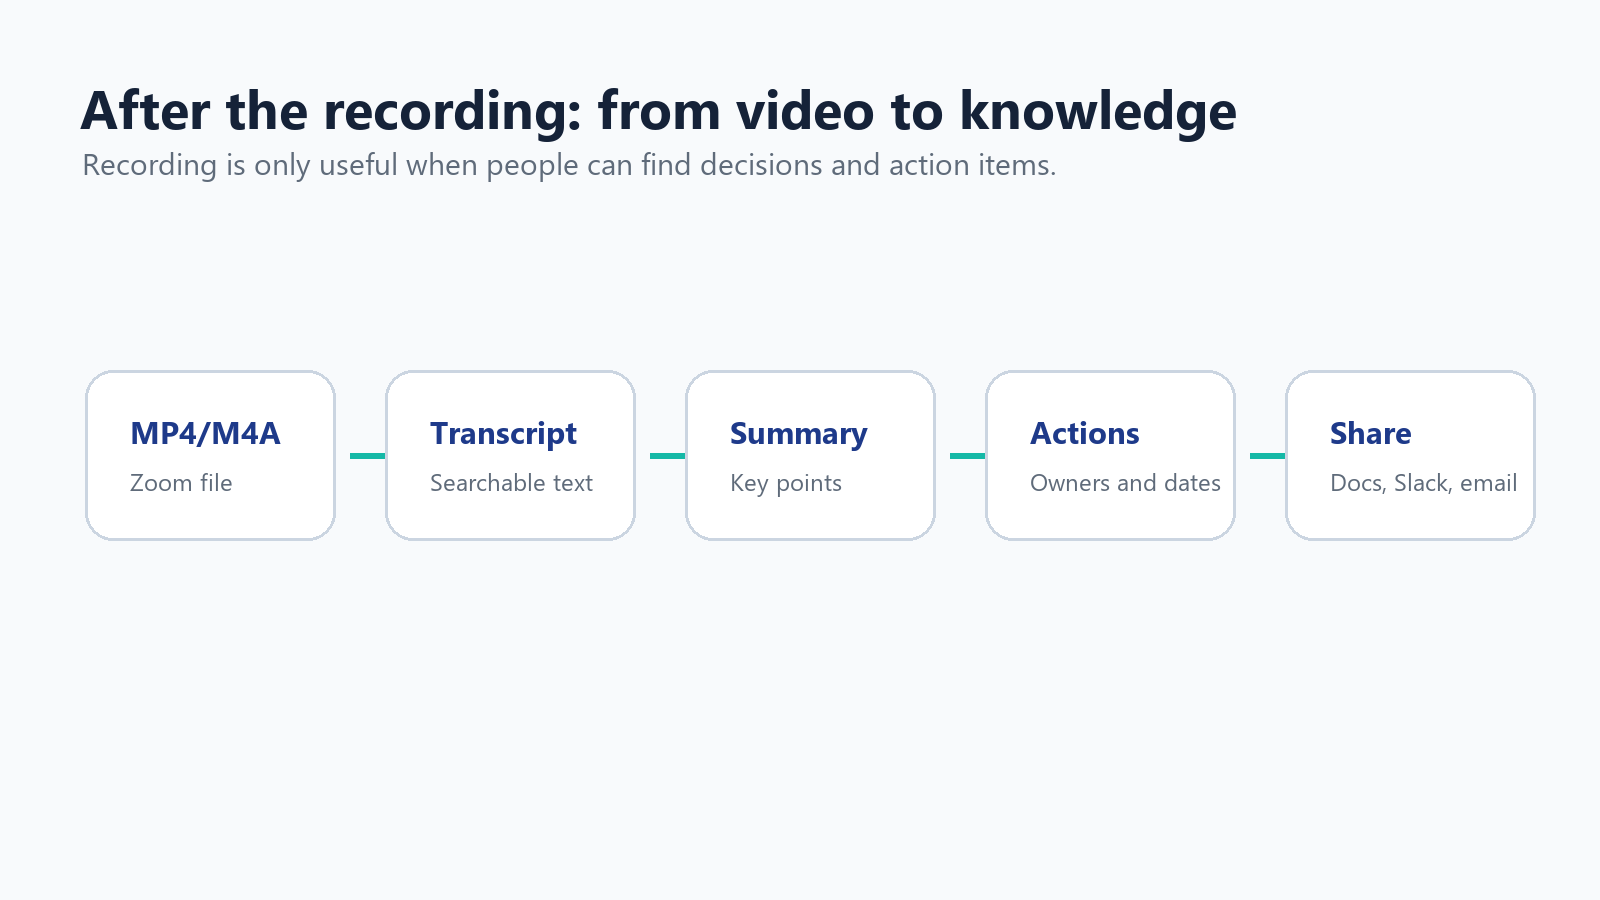
Transcribe the Recording
A recording is not the same thing as a useful record. If the meeting contains decisions, customer quotes, technical requirements, or next steps, turn the audio into text. Zoom cloud recording can generate transcript files when the right features are enabled, but many teams need broader language support, cleaner summaries, and better action-item extraction.
For multilingual teams, HiNoter's AI Meeting Assistant can automatically join Zoom meetings, transcribe the conversation, and create structured notes, decisions, and action items. If you already have a Zoom MP4 or M4A file, HiNoter's video-to-text workflow can turn the recording into a searchable transcript and summary instead of forcing someone to rewatch the entire meeting.
Clip, Compress, and Share
Long recordings are expensive to store and painful to review. Trim silence, remove setup time, and export a copy for sharing. Keep the original only when your retention policy requires it. For large files, compress the MP4 or upload it to a controlled cloud folder rather than sending it as an attachment.
Trim the first and last minute if they contain setup chatter.
Cut private breaks or irrelevant waiting time.
Export a lower-resolution copy for routine sharing.
Store the original in a restricted folder if it contains sensitive information.
Delete recordings after their retention period expires.
Reference: Zoom Support explains that cloud recording storage limits can block new cloud recordings when storage is full, while existing recordings remain accessible. Source
Name and Store Recordings So People Can Actually Find Them
A recording library becomes useless when every file is called zoom_0.mp4. Use a consistent naming pattern and store recordings beside the project or customer record they belong to. The goal is not to keep every meeting forever; the goal is to preserve the few recordings that are worth revisiting and turn the rest into concise notes.
Use a naming pattern such as YYYY-MM-DD - Account - Topic - Recording.mp4.
Create a separate folder for raw recordings, edited clips, transcripts, and summaries.
Move finished summaries into Notion, Google Docs, a CRM, or the project wiki.
Keep the original recording only as long as the business purpose requires it.
Document who owns deletion so old recordings do not quietly accumulate.
Part 6: Privacy, Consent, GDPR, and CCPA Basics
Recording a meeting is not just a productivity choice. It can create a file containing voices, images, names, chat messages, screen shares, customer information, and business context. Treat that recording as sensitive unless you have a clear reason not to.
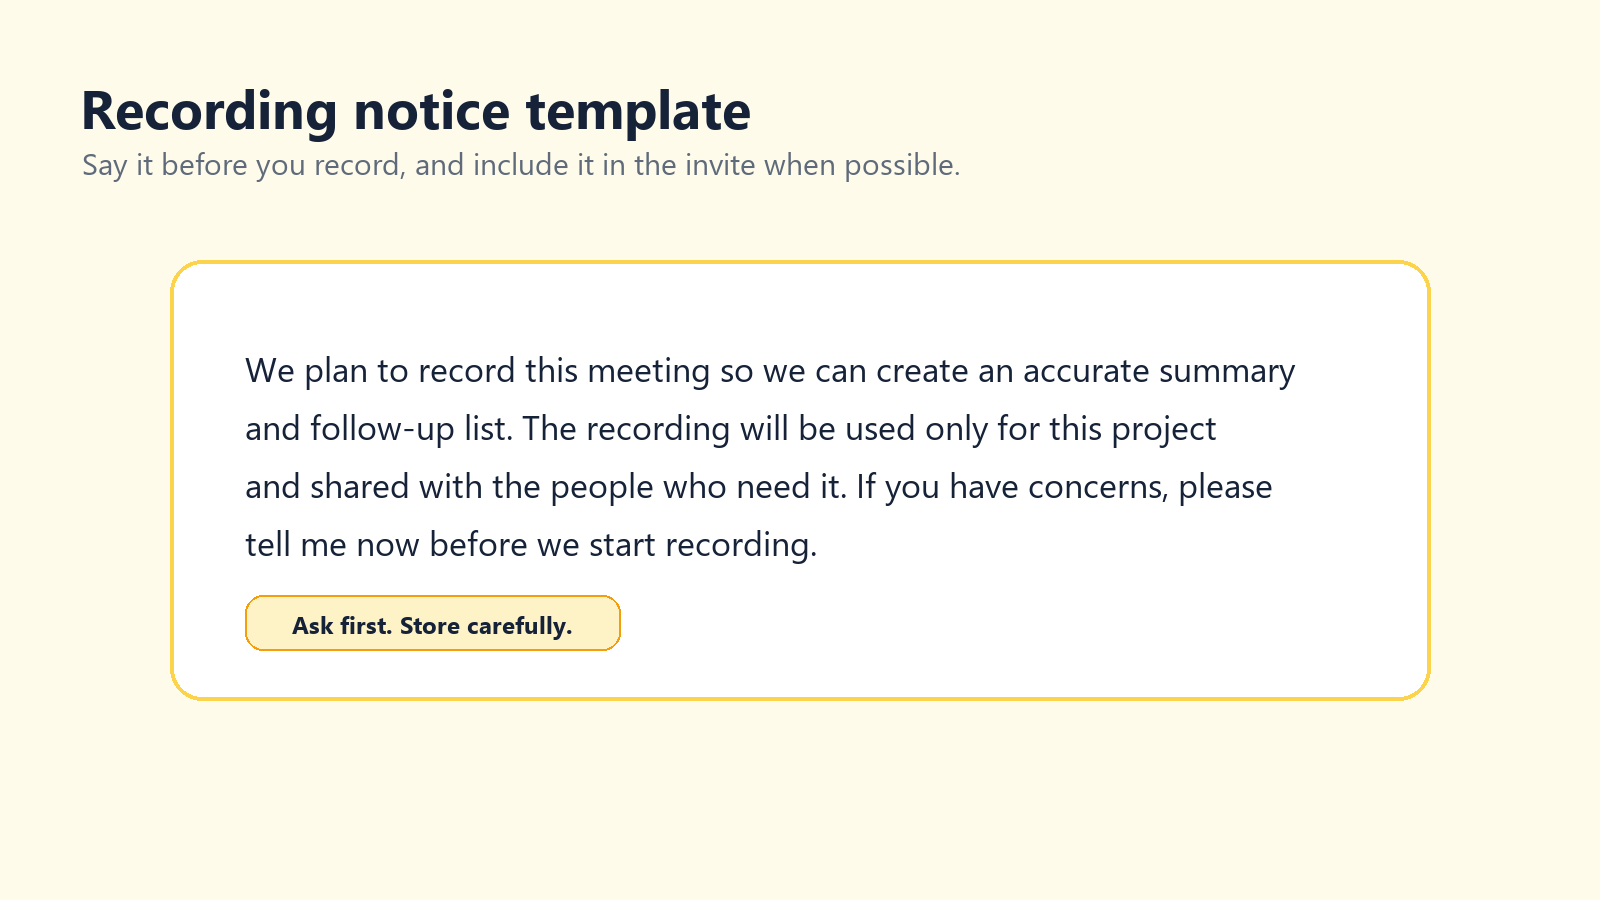
Zoom states that it will always notify meeting participants when a meeting is being recorded. That built-in notice is helpful, but it is not a full privacy program. Teams should also say why the meeting is being recorded, how it will be used, who can access it, and how long it will be kept.
Reference: Zoom Support, 'Modifying recording notification prompts.' Source
Reference: European Data Protection Board guidance notes that photos, videos, and audio recordings containing images or sounds of individuals can be personal data. Source
Reference: California Privacy Protection Agency explains that personal information includes data that identifies, relates to, or could reasonably be linked to a person or household. Source
A Simple Recording Notice Script
Host script I would like to record this meeting so we can produce an accurate summary and follow-up list. The recording will be used for this project and shared only with the people who need it. If anyone has concerns, please tell me before I start recording. |
For sales calls, interviews, HR meetings, legal conversations, healthcare discussions, or EU/California participants, ask your legal or privacy team for the approved wording. This article is practical guidance, not legal advice.
Storage and Access Rules
Do not store sensitive meeting recordings on a personal desktop indefinitely.
Limit access to people with a clear business need.
Use passcodes or authenticated viewing for cloud recordings.
Create a deletion schedule before recordings pile up.
Keep transcripts and summaries under the same access rules as the video.
Do not upload confidential recordings to unknown converter or transcription sites.
Troubleshooting Common Zoom Recording Problems
Problem | Likely cause | Fix |
The Record button is missing | You are not the host, not a co-host, or recording is disabled. | Ask the host to grant permission or check account settings. |
The meeting ended and nothing was recorded | Nobody clicked Record and automatic recording was off. | Enable automatic recording for recurring meetings that must be captured. |
Free account has no cloud option | Cloud recording requires a paid licensed account. | Use local recording or an approved screen recorder. |
The file is huge | Long video, gallery view, or high-motion content. | Trim, compress, upload to controlled storage, or record screen share only next time. |
Only my face was recorded | The layout captured your view instead of the shared screen. | Test active speaker/shared screen layout before the meeting. |
Transcript is weak | Poor audio, crosstalk, accents, or limited language support. | Improve microphones and use a multilingual AI transcription workflow. |
Cannot share cloud recording | Passcode, auth, admin policy, expiration, or storage setting. | Review sharing settings in the Zoom web portal. |
Final Recommendation
For most people, the simplest path is this: hosts should use Zoom local recording for quick MP4 files and Zoom cloud recording when they need team sharing, mobile recording, or admin controls. Participants should not treat recording as a workaround game; ask for permission or use an approved notes workflow. Free users should learn local recording first and use OBS, QuickTime, or system recording only when the meeting owner and participants understand what is happening.
The recording itself is only the raw material. The real value comes after the meeting: a clean transcript, a short summary, action items, and a searchable record people can trust. That is where tools like HiNoter fit naturally: not as another place to hoard videos, but as a way to turn meetings into usable knowledge.
FAQ
Can you record a Zoom meeting for free?
Yes. Free Zoom users can use local recording on the desktop app. Free users do not get Zoom cloud recording.
Can a participant record a Zoom meeting?
A participant can record inside Zoom only if the host grants local recording permission or makes them a co-host. Otherwise, they should ask for the official recording or use an approved alternative.
Where are Zoom local recordings saved?
By default, Zoom computer recordings are saved in the Documents folder in a folder named Zoom. You can also open Zoom settings and check the Recording tab.
What format does Zoom use for recordings?
Zoom recordings commonly include MP4 video, M4A audio, and TXT chat files. Cloud recordings may also include VTT transcript or caption files when enabled.
Does Zoom notify people when recording starts?
Yes. Zoom says it will always notify participants when a meeting is being recorded. Depending on account settings, participants may see a consent prompt or hear an audio prompt.
Can I record a Zoom meeting without host permission?
You should not secretly record a Zoom meeting. If you need a record, ask the host for permission, request the official recording, or use an approved note-taking workflow.
How do I make sure I do not forget to record?
Use automatic recording for meetings that must be captured, add a calendar reminder, or assign a recording owner before the meeting begins.