How to Screen Record on Chromebook (Built-in & Apps)
A practical guide to ChromeOS Screen Capture, audio settings, webcam overlays, WebM conversion, editing, and the best recorder apps.
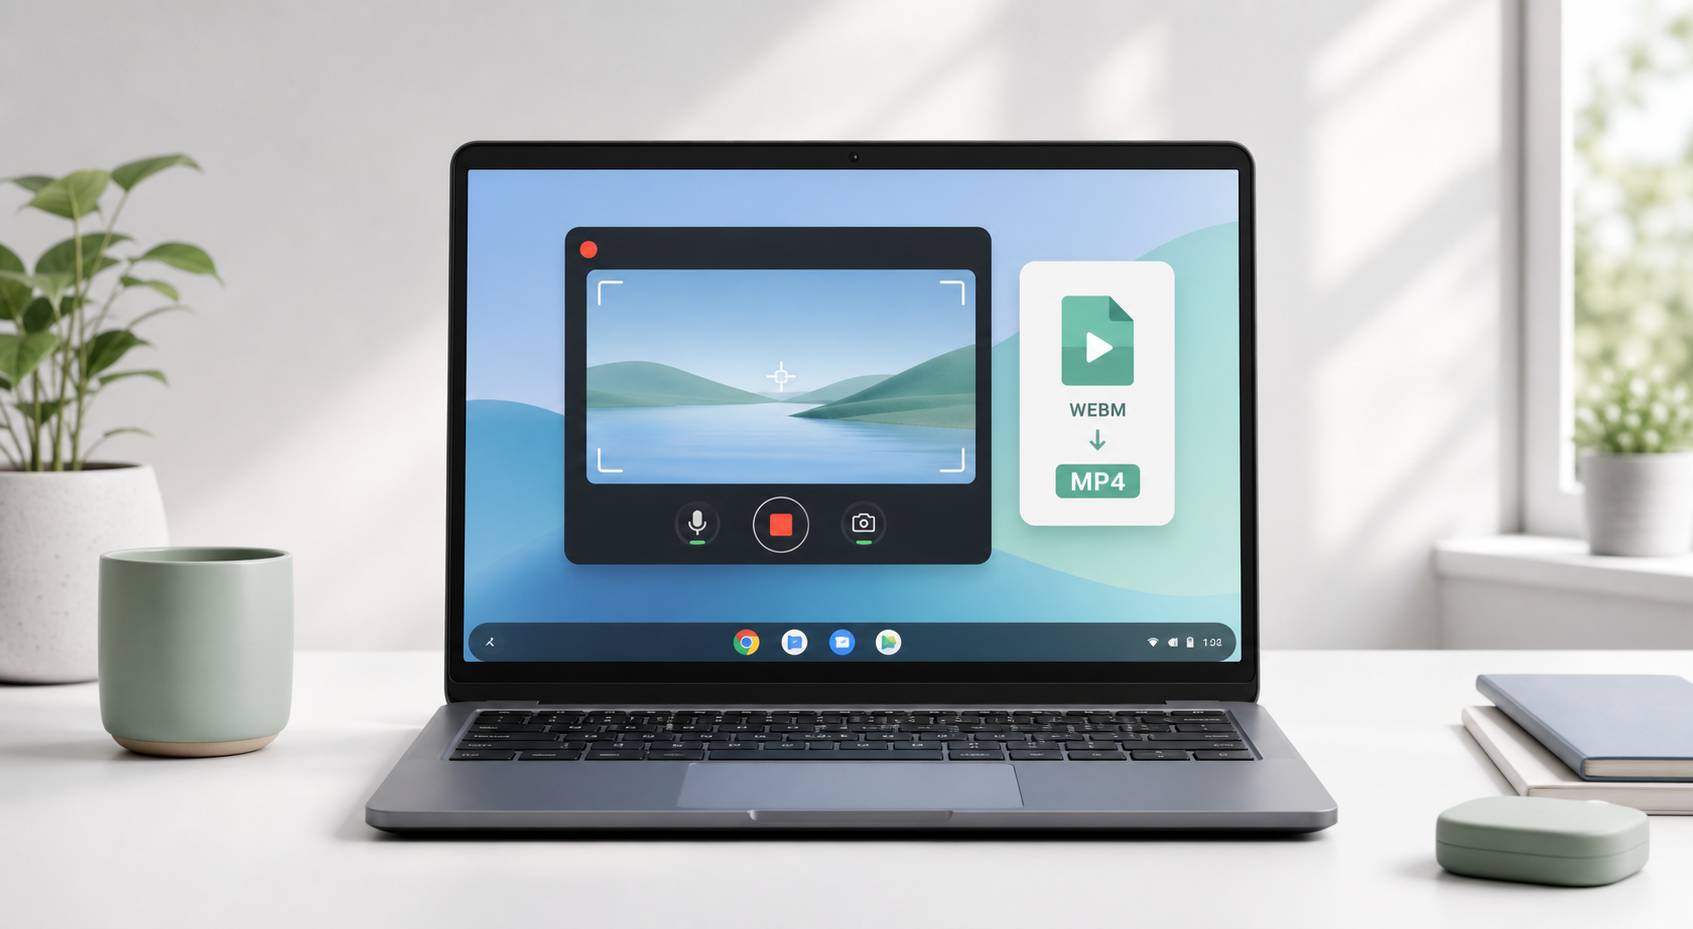
If you're trying to figure out how to screen record on Chromebook, start with the tool already built into ChromeOS. You do not need to install software for basic screen recording. Press Ctrl + Shift + Show windows key to open Screen Capture, choose video recording, select full screen, partial screen, or a window, and start recording.
That simple answer solves most cases. The details matter, though: where the file goes, why sound may be missing, why Chromebook recordings save as WebM, and what to use when you need webcam picture-in-picture, internal audio, editing, or easier sharing.
Google's Chromebook Help documentation says Screen Capture recordings are saved as .webm files and saved to Downloads by default unless you choose another location. Current ChromeOS Screen Capture settings may also offer device audio, microphone audio, or both, depending on device, version, and administrator settings.
Reference: Google Chromebook Help, 'Take a screenshot or record your screen.' Source
What's in this guide A practical Chromebook recording walkthrough: built-in Screen Capture, audio fixes, webcam options, WebM conversion, app recommendations, performance troubleshooting, and publishing schema. |
Use the built-in Chromebook screen recorder
Record with audio and fix missing sound
Use webcam picture-in-picture
Compare Chrome extensions and Android apps
Convert WebM to MP4 and edit recordings
Avoid lag and record better tutorials
Choose the right recorder by use case
Quick Answer: Chromebook Has a Built-in Screen Recorder
Chromebook includes a native screen recorder called Screen Capture. For quick tutorials, bug reports, class assignments, and simple walkthroughs, it is usually the best first choice because it is free, already installed, and designed for ChromeOS.
Record the full screen, a selected area, or one window.
Capture microphone audio, device audio, or both when supported.
Use the front camera on supported devices.
Show clicks, key combinations, and touch gestures for tutorials.
Find the finished recording in Downloads as a WebM file by default.
Best first move Use the built-in Chromebook screen recorder first. Install Loom, Screencastify, Nimbus-style tools, AZ Screen Recorder, or XRecorder only when you need cloud sharing, webcam layout controls, Android app recording, annotation, or MP4 export. |
Method 1: Record on Chromebook with the Built-in Screen Capture Tool
Step 1: Open Screen Capture
Press Ctrl + Shift + Show windows key. The Show windows key is usually on the top row, around the sixth key from the left. It looks like a rectangle with two vertical lines beside it. If you're using an external keyboard without that key, use Ctrl + Shift + F5.
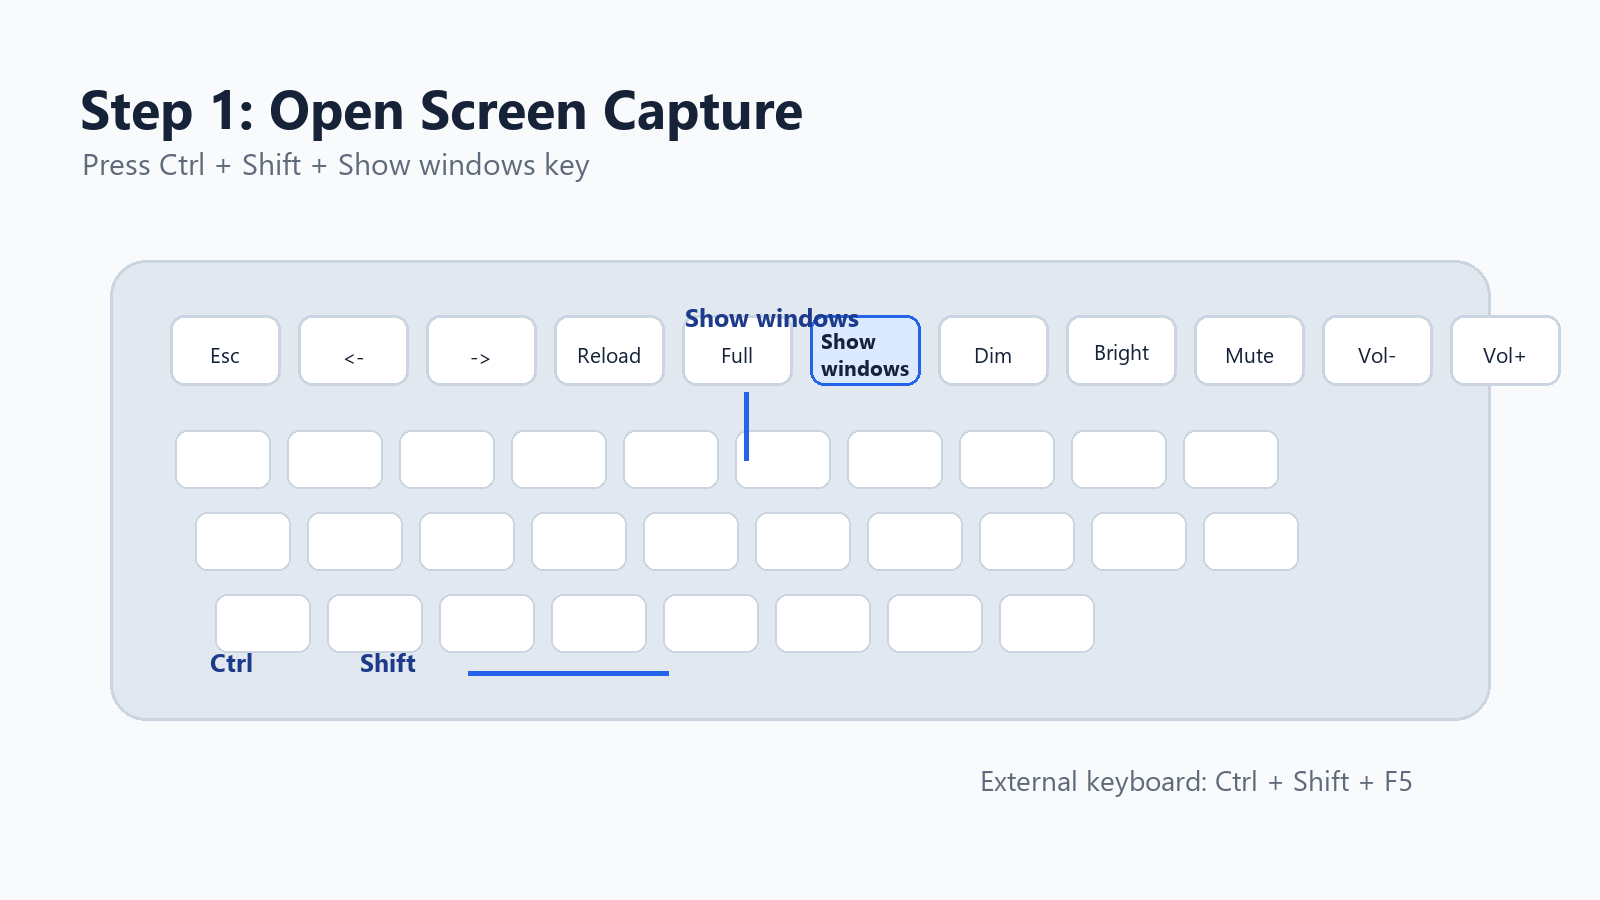
Screenshot-style illustration: the Show windows key and Chromebook screen recording shortcut.
You can also open the tool from the shelf: click the time in the bottom-right corner, then select Screen Capture from Quick Settings.
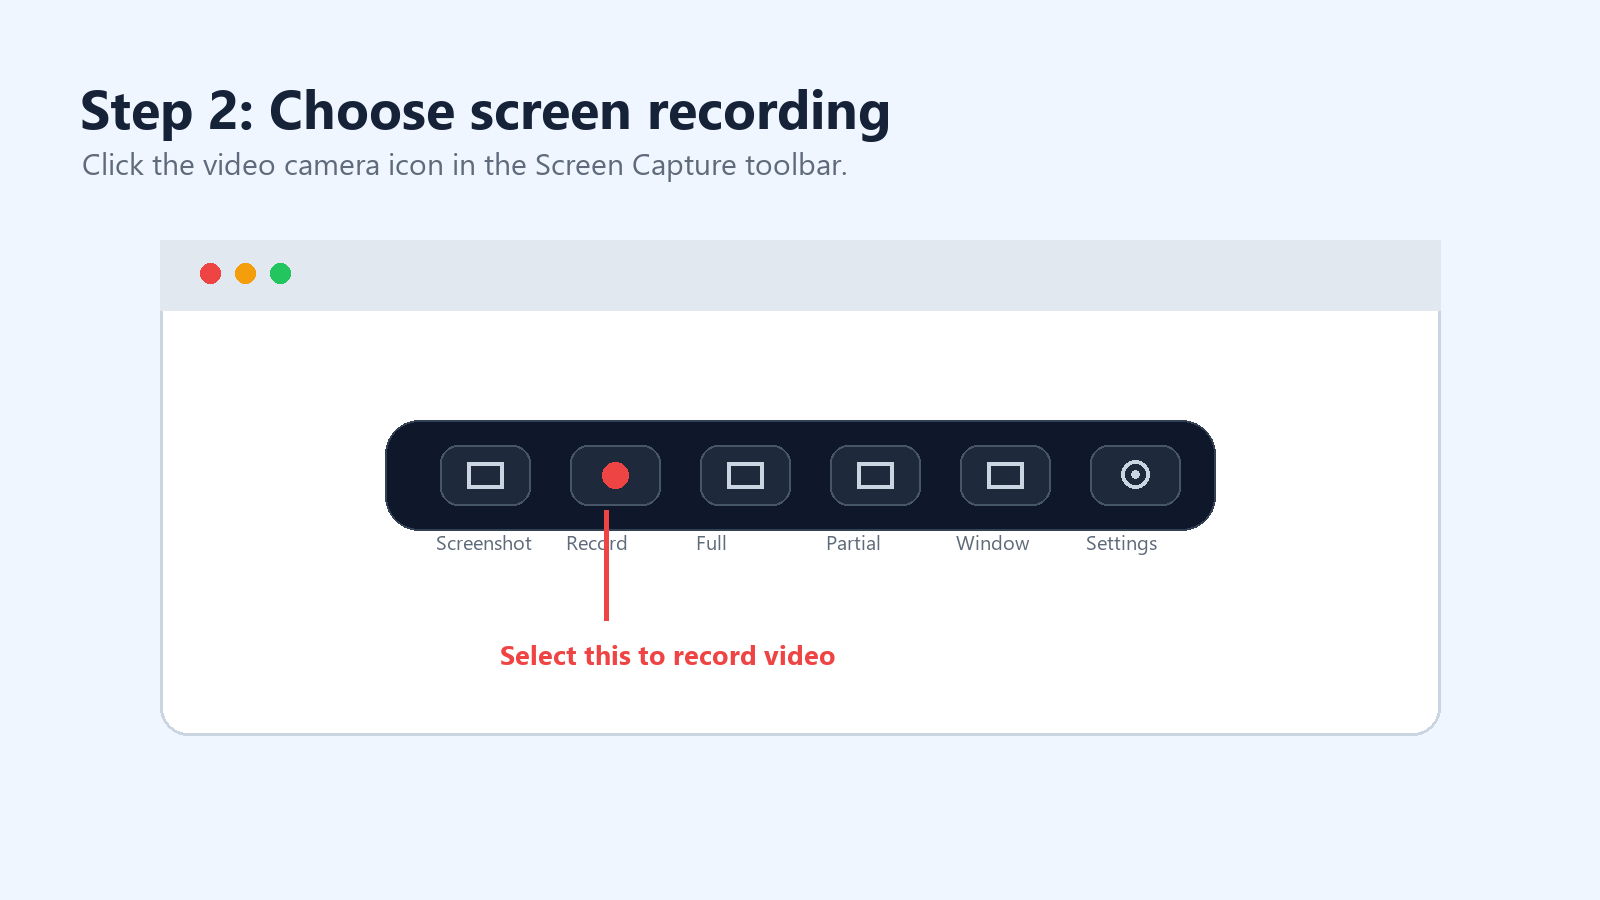
Step 2: Switch from Screenshot to Screen Recording
The Screen Capture toolbar has two modes: screenshot and screen record. Choose the video camera icon to record video instead of taking a still image.

Screenshot-style illustration: choose the video camera icon in the Screen Capture toolbar.
Step 3: Choose Full Screen, Partial Screen, or Window
ChromeOS gives you three recording areas. Full screen is best for complete workflows. Partial screen helps hide private tabs or notifications. Window recording is the cleanest option when you only need one app, browser window, or presentation.
Screenshot-style illustration: full screen, partial screen, and window recording options.
Step 4: Turn on Audio, Camera, or Click Indicators
Click the settings gear in the Screen Capture toolbar. On current ChromeOS versions, you may see options such as Device audio, Microphone, Device audio and microphone, Front Camera, and Show clicks and keys.
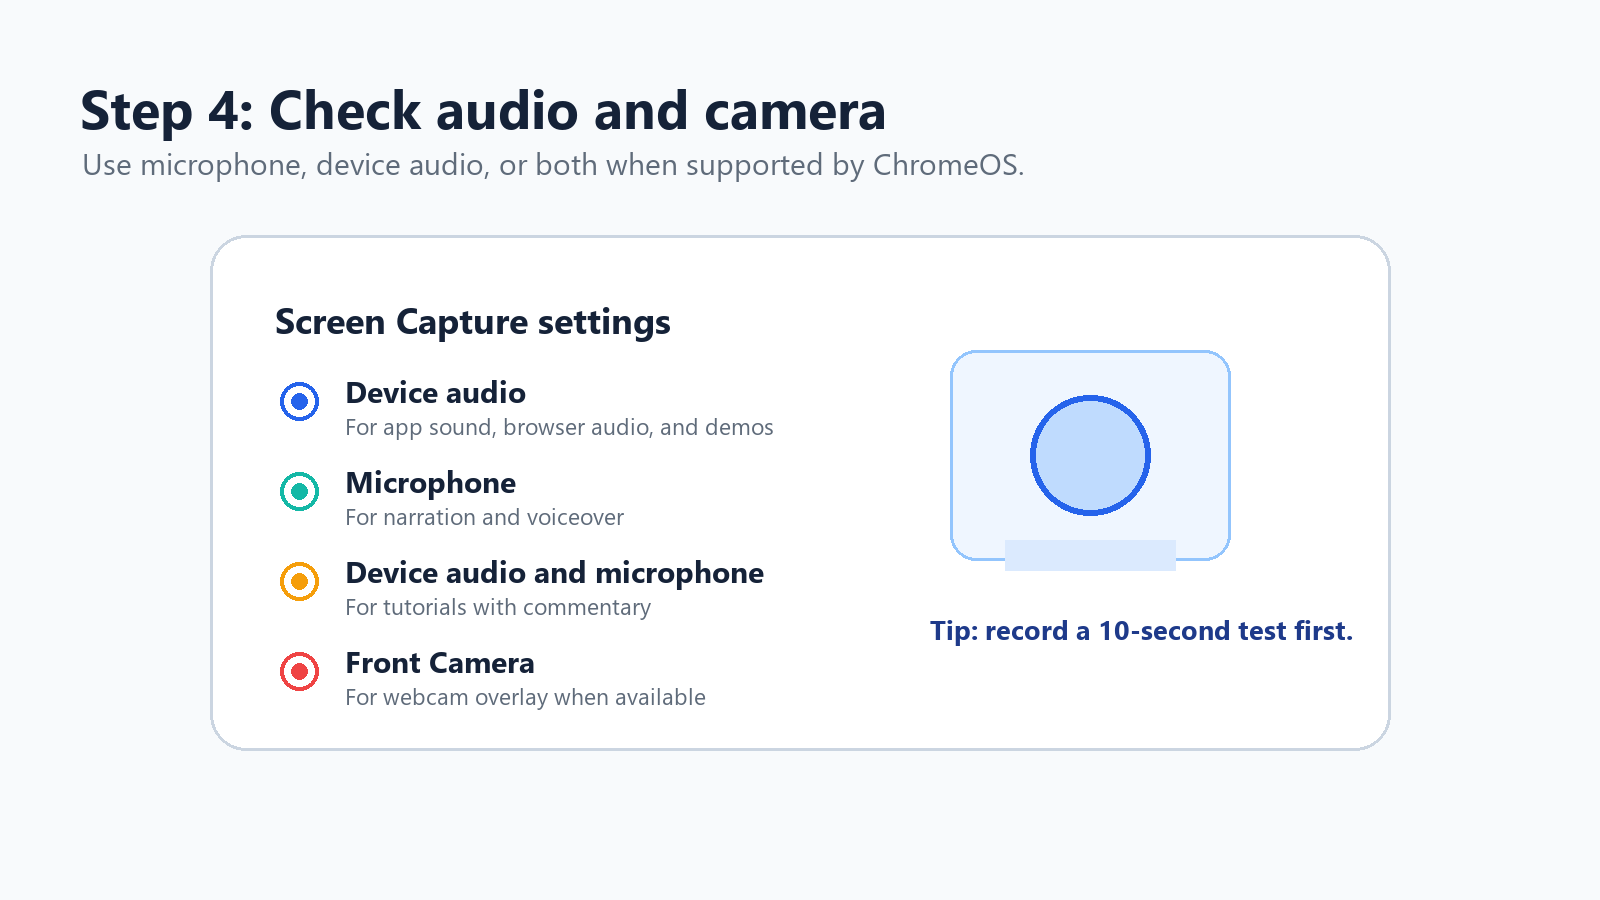
Screenshot-style illustration: ChromeOS audio and camera settings for screen recording.
Use Microphone for narration or voiceover.
Use Device audio for app sound, browser audio, and product demos.
Use Device audio and microphone for tutorials with commentary.
Enable clicks and keys when viewers need to follow your exact actions.
Step 5: Start, Stop, and Find the Recording
To start a full-screen recording, click anywhere on the screen. For partial screen, drag to select the area and start. For window recording, click the window you want to capture. To stop, click the stop recording button in the shelf area or press Search + Shift + X.
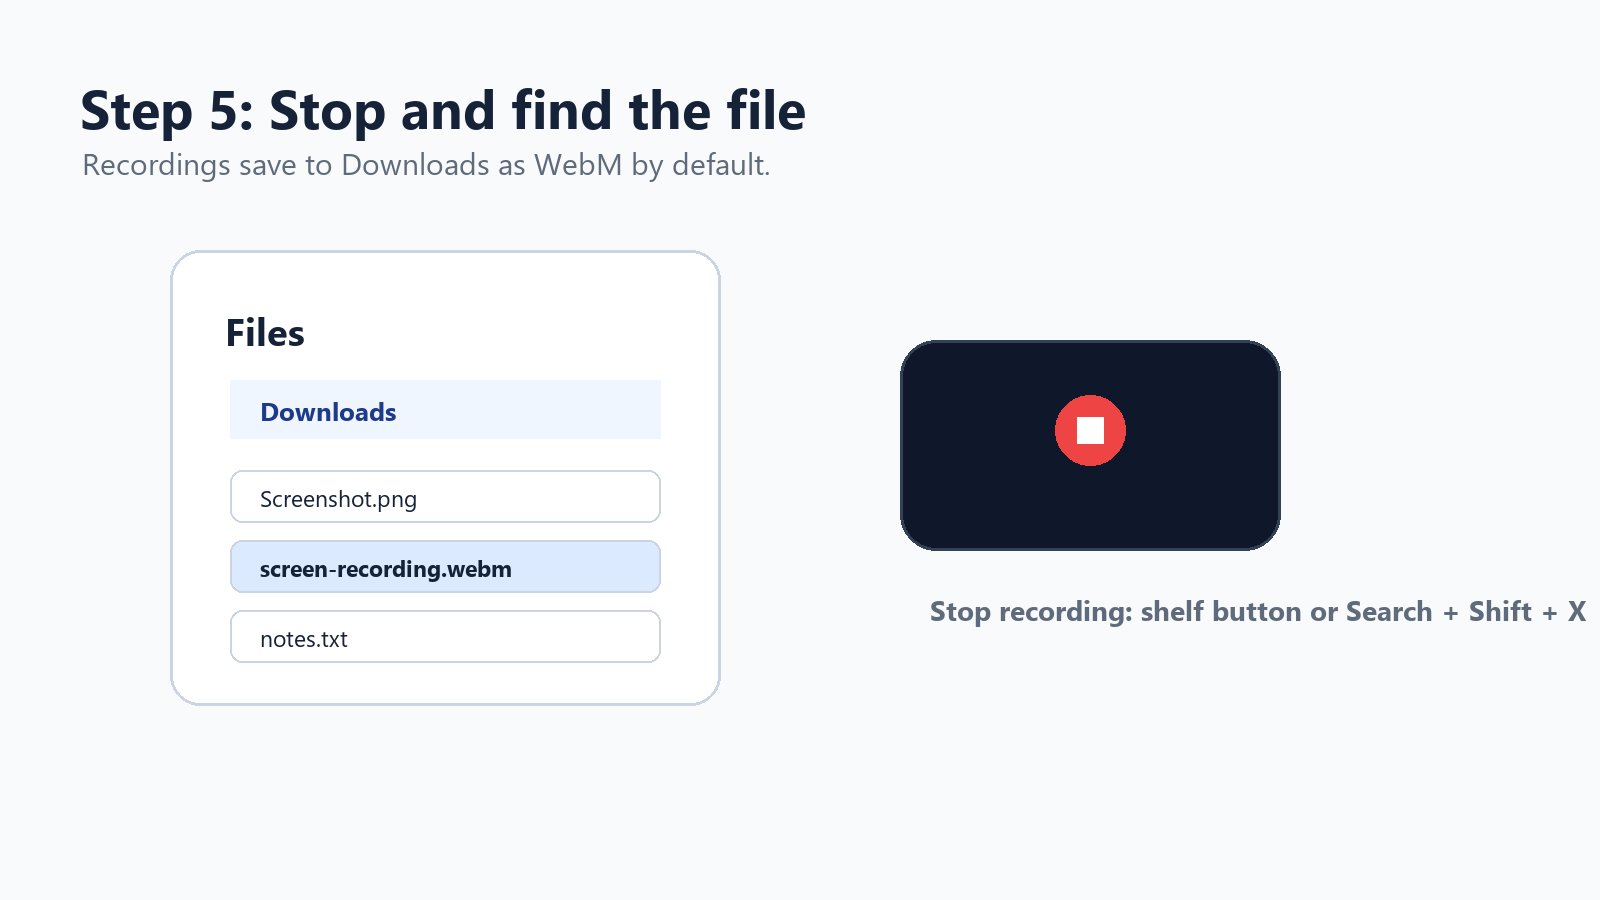
Screenshot-style illustration: finished recordings are saved in Downloads as WebM files by default.
Chromebook Screen Recorder Shortcut Cheat Sheet
Task | Shortcut or action |
Open Screen Capture | Ctrl + Shift + Show windows key |
External keyboard shortcut | Ctrl + Shift + F5 |
Stop screen recording | Search + Shift + X |
Open from settings | Click time > Screen Capture |
Find saved recording | Files app > Downloads |
Default video format | WebM |
Best quick mode | Window or partial screen |
How to Screen Record on Chromebook with Audio
Audio is the part that trips people up most. Current ChromeOS Screen Capture settings may let you choose device audio, microphone, or both. If you see those options, select the one that matches your recording.
Why a Chromebook screen recording may have no sound The recorder may be set to no audio, the wrong microphone may be selected, ChromeOS may need an update, a school or company admin may restrict capture, or the app being recorded may block internal audio for policy or copyright reasons. |
Reopen Screen Capture and click the settings gear.
Choose Microphone, Device audio, or Device audio and microphone if available.
Record a 10-second test clip before the real take.
Update ChromeOS if device audio does not appear.
Restart the Chromebook if permissions seem stuck.
If the Chromebook is managed by a school or company, ask whether recording settings are controlled by an administrator.
One important caveat: protected media, streaming services, games, or Android apps may block internal audio capture. In that case, switching tools may not fix the issue. Use licensed content, record narration only, or capture your own original material.
How to Record Webcam and Screen at the Same Time
For a tutorial, course video, product demo, or internal training clip, a webcam overlay can make the recording feel more personal. Current ChromeOS Screen Capture may support front camera recording on supported devices, so check the built-in tool first.
If you need more control over the camera bubble, layout, branding, trimming, viewer comments, or share links, use a Chrome extension.
Tool | Best for | Strength | Tradeoff |
Loom | Async work videos, sales demos, team updates | Fast sharing, webcam, audio, comments, cloud library | Free plan or workspace limits may apply |
Screencastify | Education, training, classroom walkthroughs | Browser tab, desktop, webcam, audio, and editing workflow | Some advanced features depend on plan |
Nimbus/FuseBase-style tools | Documentation and screenshots plus video | Annotations, screenshots, video, and workflow capture | Can feel heavier on low-end Chromebooks |
Method 2: Best Chrome Extensions for Chromebook Screen Recording
Chrome extensions are useful when the native recorder feels too basic. They can add webcam overlays, cloud hosting, viewer analytics, comments, drawing tools, trimming, and easier sharing.
Loom is usually the smoothest choice for quick workplace communication. Screencastify is comfortable for teachers and training teams. Nimbus-style capture tools make sense when screenshots, annotations, and longer documentation live in the same workflow.
References: Loom Chrome recorder, Screencastify Chrome extension, and Nimbus/FuseBase capture documentation. Source
Method 3: Android Screen Recorder Apps on Chromebook
Many Chromebooks can install Android apps from Google Play. That opens the door to mobile-style screen recorders such as AZ Screen Recorder and XRecorder. These apps are most useful when you are recording Android apps, mobile games, or content inside the Android environment. They may be less reliable for full desktop ChromeOS workflows.
App | Use it when | Notes |
AZ Screen Recorder | You record Android games or Android app tutorials. | Popular no-root recorder with editing and live streaming features listed on Google Play. |
XRecorder | You want floating controls, facecam, screenshots, and custom FPS. | Google Play lists features such as facecam, internal audio on supported Android versions, editing, and no-root recording. |
References: AZ Screen Recorder and XRecorder listings on Google Play. Source
How to Convert Chromebook WebM Recordings to MP4
The built-in Chromebook recorder saves video as WebM. WebM is efficient and web-friendly, but some clients, older apps, LMS platforms, and messaging tools still prefer MP4.
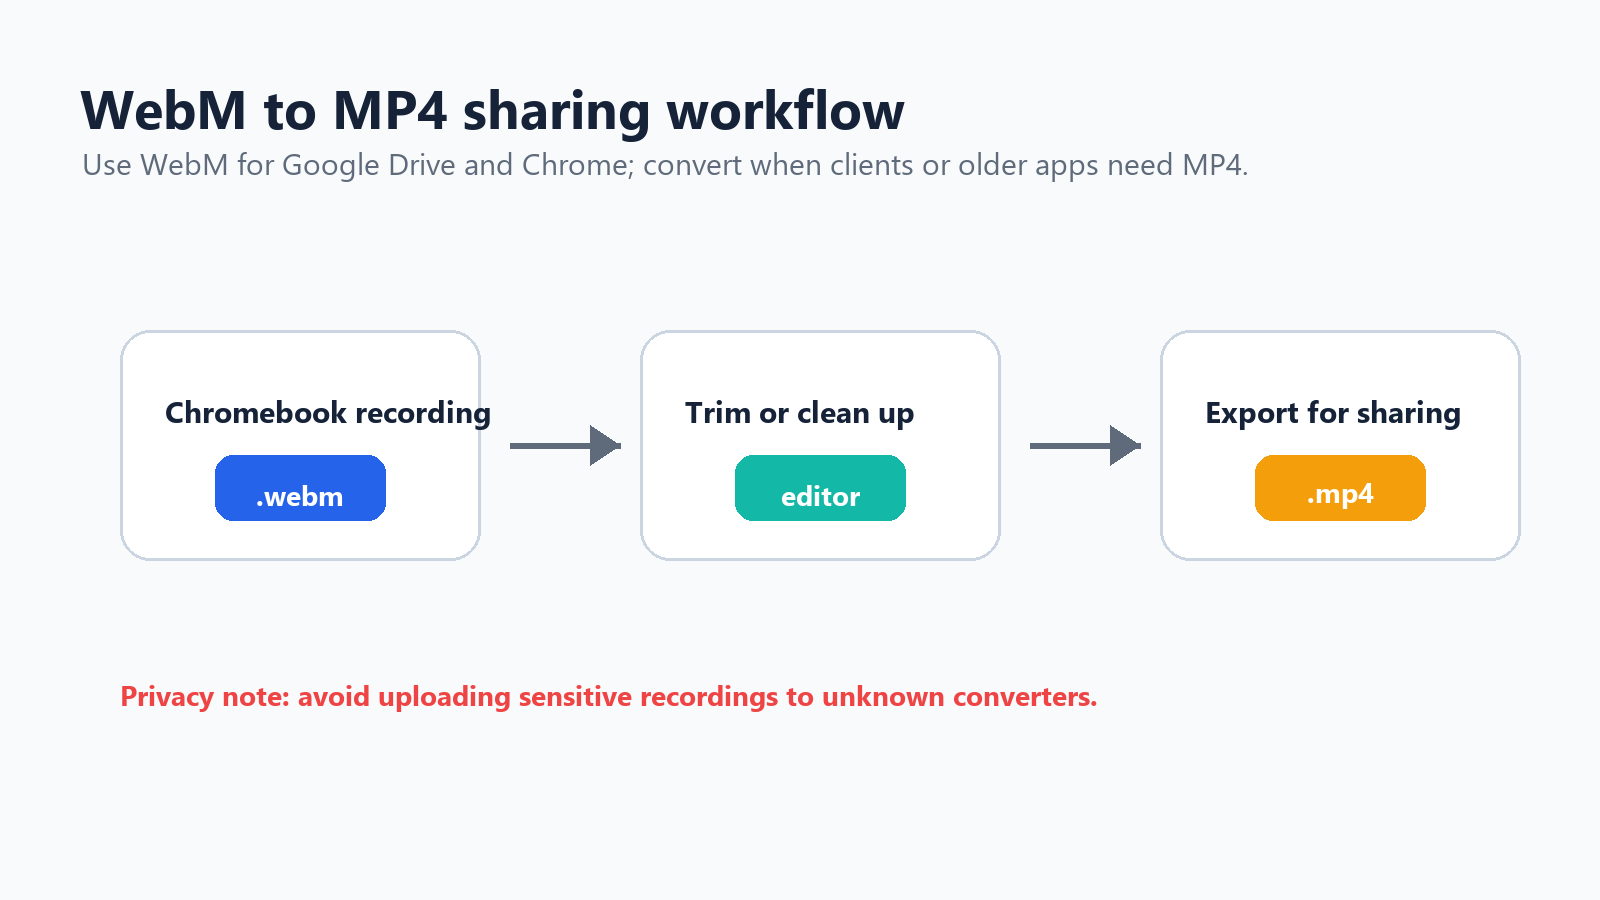
Workflow illustration: Chromebook WebM recording to edited MP4 sharing file.
Share WebM directly if the recipient uses Chrome, Google Drive, or a modern browser.
Use a reputable online converter for non-sensitive videos, then delete the uploaded file if the service allows it.
Use a video editor if you also need trimming, captions, cropping, or compression.
Use FFmpeg through Linux on Chromebook if you are comfortable with command-line tools: ffmpeg -i recording.webm recording.mp4.
How to Edit a Chromebook Screen Recording
For light edits, try Google Photos, Loom or Screencastify's editor, browser-based video editors, or Android apps such as XRecorder and AZ Screen Recorder. A practical workflow is simple: record in short sections, trim the start and end, remove long pauses, add captions if the video is instructional, export to MP4 if needed, and share through Drive, YouTube, Slack, your LMS, or a help center.
Context: Wyzowl's 2025 video marketing statistics report that 89% of businesses use video as a marketing tool. Source
Recording Meetings? Do Not Use Screen Recording as Your Only Notes System
Screen recording is helpful when you need a visual replay. It is not always the best way to preserve decisions, action items, or meeting context. A one-hour meeting creates a one-hour video. Someone still has to rewatch it, find the useful parts, write the summary, and send follow-ups.
For meetings, interviews, webinars, or customer calls, HiNoter's AI Meeting Assistant is a better fit than a plain screen recording. HiNoter can automatically join Zoom, Google Meet, and Microsoft Teams meetings, transcribe the conversation, and generate structured notes, decisions, and action items after the call. If you already have a Chromebook recording, you can upload it to HiNoter's video-to-text tool to turn the video into a searchable transcript instead of scrubbing through the timeline.
Use the right tool for the job Use Chromebook screen recording when visual steps matter. Use AI meeting notes when spoken decisions, tasks, and follow-ups matter. |
Why Chromebook Screen Recording Gets Laggy
If your screen recording stutters during games, streaming, or heavy browser sessions, it is usually a performance issue rather than a recorder issue.
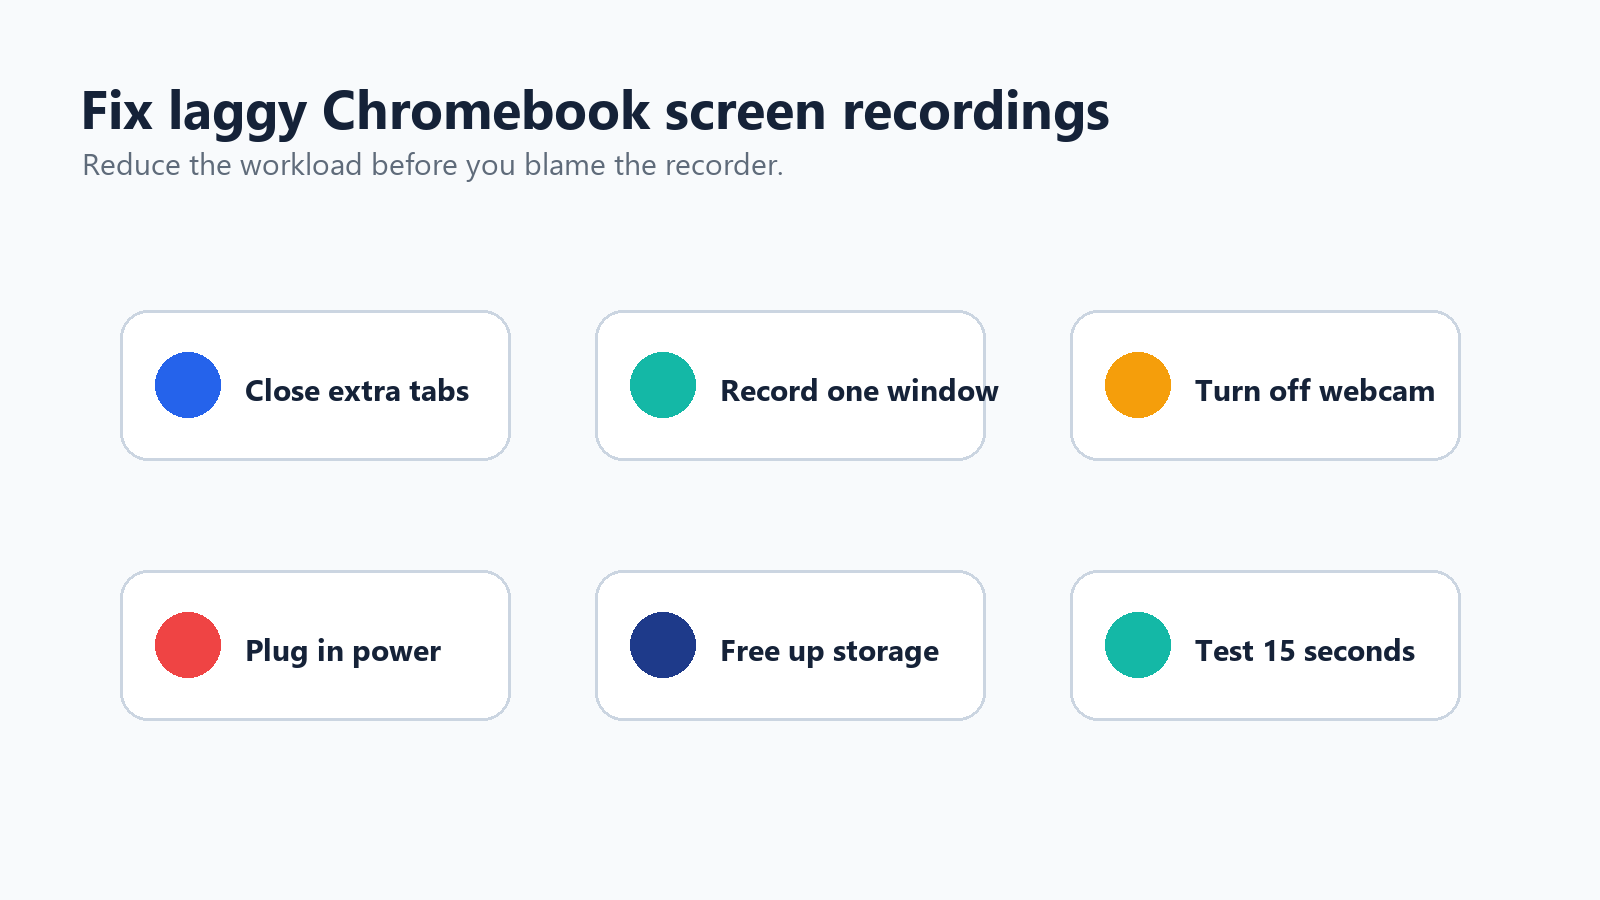
Troubleshooting illustration: six quick ways to reduce lag during Chromebook screen recording.
Close unused tabs and apps.
Record a window instead of the full screen.
Lower the video resolution if your app supports it.
Turn off webcam overlay for demanding recordings.
Keep the Chromebook plugged in.
Free up storage before recording.
Avoid recording protected streaming content.
Restart before long recordings.
Use a Chrome extension with FPS controls if needed.
Best Practices for Chromebook Tutorial Recordings
Write a five-line outline before you record.
Hide personal tabs, notifications, bookmarks, and downloads.
Zoom the page to 110% or 125% for readability.
Use a clean desktop background.
Test audio with a 10-second clip.
Keep each recording under 5-8 minutes when possible.
Record in sections instead of one long take.
Use clicks and key indicators for tutorials.
Name files clearly, such as chromebook-demo-part-1.webm.
For software tutorials, explain what you are doing before you do it. Viewers should never have to guess why your cursor moved.
Native Chromebook Recorder vs Apps: Which Should You Use?
Use case | Best option | Why |
Quick tutorial | Built-in Screen Capture | Free, fast, and no install required |
Recording with system audio | Built-in tool first | Current ChromeOS supports device audio on many devices |
Webcam picture-in-picture | Loom or Screencastify | More control over camera layout and sharing |
Teacher lesson | Screencastify | Classroom-friendly recording and editing workflow |
Team async update | Loom | Fast link sharing and comments |
Android app or game | AZ Screen Recorder or XRecorder | Designed for Android-style recording |
Meeting notes | HiNoter | Turns conversations into summaries and action items |
Need MP4 export | Extension, editor, or converter | Native Chromebook output is WebM |
Low-end Chromebook | Built-in recorder | Lighter than many third-party tools |
Final Recommendation
Start with the built-in Chromebook Screen Capture tool. It is the fastest way to record your screen, and for many users it is all they need. Use Ctrl + Shift + Show windows key, choose screen record, select the area, turn on the right audio option, and check the Downloads folder for the WebM file.
Move to Loom, Screencastify, or a capture extension when you need polished sharing, webcam overlays, annotations, or browser-based editing. Use Android apps like AZ Screen Recorder or XRecorder mainly for Android games and app demos. And if the real goal is to remember what was said in a meeting, convert the recording into structured notes with HiNoter instead of making someone rewatch the whole thing.
FAQ
Can you screen record on a Chromebook without installing anything?
Yes. Chromebook has a built-in Screen Capture tool. Press Ctrl + Shift + Show windows key, select the video recording icon, choose full screen, partial screen, or window, and start recording.
Where is the Show windows key on Chromebook?
The Show windows key is usually on the top row, around the sixth key from the left. It looks like a rectangle with two vertical lines. If you use an external keyboard, press Ctrl + Shift + F5.
Why does my Chromebook screen recording have no sound?
Open Screen Capture settings and check your audio source. Choose microphone, device audio, or both if available. Some managed devices, older ChromeOS versions, or protected content may limit audio recording.
What format does Chromebook screen recorder use?
The built-in Chromebook screen recorder saves videos as WebM files.
How do I convert Chromebook screen recordings to MP4?
Use a trusted WebM-to-MP4 converter, a video editor, or FFmpeg if Linux is enabled on your Chromebook. If the recipient uses Chrome or Google Drive, sharing the WebM file directly may be enough.
Can Chromebook record screen and webcam together?
Current ChromeOS Screen Capture may support front camera recording on supported devices. For more flexible webcam overlays, use Loom or Screencastify.