How to Screen Record on MacBook (With Audio & Webcam)
MacBook built-in screen recording starts with Cmd+Shift+5. If you searched how to screen record on MacBook, the fastest answer is to open the Screenshot toolbar, choose full screen or selected portion, set Options, click Record, then stop from the menu bar. The catch is audio: macOS can record your microphone, but it does not reliably capture internal system audio unless you route it through another source or use a tool such as OBS.
Answer box: Press Cmd+Shift+5, choose Record Entire Screen or Record Selected Portion, open Options to choose microphone, timer, mouse clicks, and save location, click Record, then click the Stop button in the menu bar. The recording normally saves as a MOV file. |
Built-In MacBook Screen Recording Steps
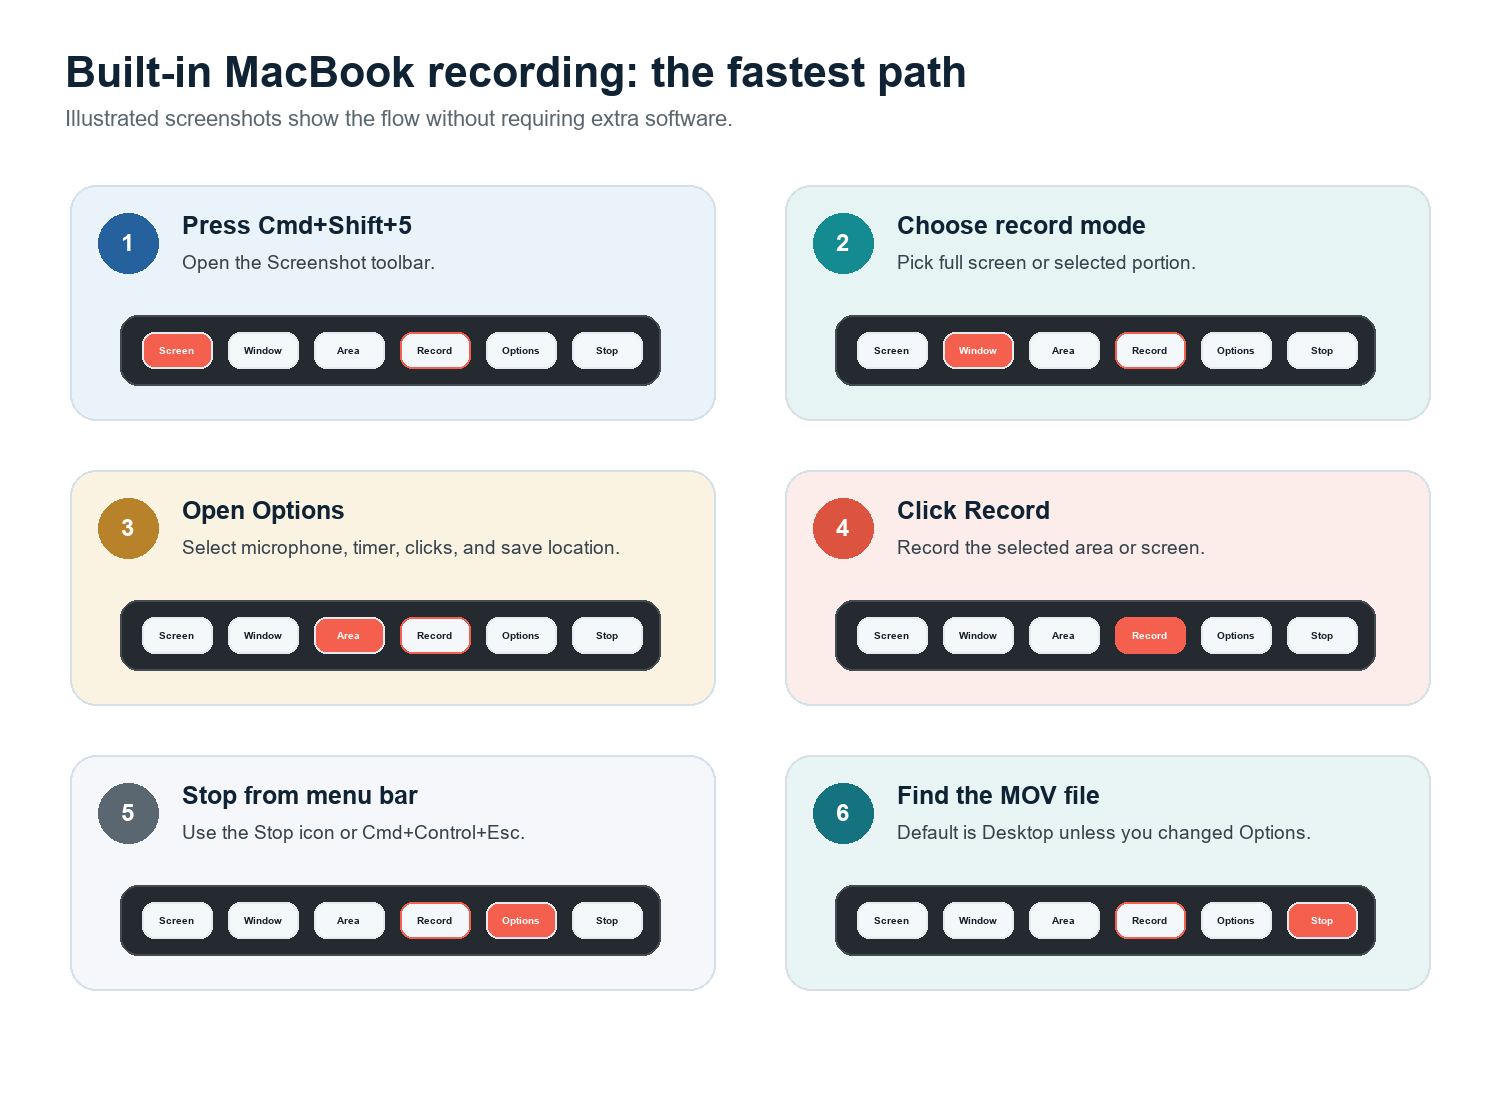
Press Cmd+Shift+5 to open the Screenshot toolbar. Apple documents this shortcut for the Screenshot app in macOS Mojave 10.14 or later.
Choose Record Entire Screen if you want everything, or Record Selected Portion if you only want part of the display.
Click Options. Pick where the file should save, choose a microphone if you want narration, set a 5- or 10-second timer if needed, and enable Show Mouse Clicks for tutorials.
Click Record. If you selected a portion, drag the frame around the app or area you want before starting.
Stop recording from the menu bar. You can also use Cmd+Control+Esc on many macOS versions.
Find the file in the destination chosen under Options. If you never changed it, check Desktop first.
QuickTime Player reaches the same tool: open QuickTime, choose File > New Screen Recording, then use the Screenshot controls. Apple says you can click Options to choose what you record, including save location, pointer, and clicks. For everyday tutorials, Cmd+Shift+5 is simply faster.
How to Screen Record Mac With Audio
Important limitation: macOS native screen recording can record microphone audio, but it is not a full system-audio recorder by default. If your MacBook recording has no sound, first check whether you selected a microphone. If you need app audio, route it with a virtual audio driver or use OBS Studio on supported macOS versions. |

Option A: Record voice narration only
Press Cmd+Shift+5 and click Options.
Under Microphone, choose MacBook Microphone, AirPods, a USB mic, or another input.
Record a 10-second sample and play it back before recording the full tutorial.
Option B: Record internal system audio with BlackHole
BlackHole is a macOS virtual audio loopback driver from Existential Audio. It can route audio between apps, and the project states that it is built for Intel and Apple Silicon. A common setup is to create a Multi-Output Device in Audio MIDI Setup so you can hear the audio while also sending it into BlackHole, then choose BlackHole as the input in the recorder.
Use this only when you have permission to record the audio.
Test before recording a long session; audio routing mistakes are easy to miss.
After recording, switch your Mac sound output back to normal so everyday audio does not disappear.
Option C: Use OBS for audio-heavy recordings
OBS Studio is the best free professional option when you need screen, webcam, microphone, scenes, and audio control. OBS documentation notes that on macOS 13 and higher, newer OBS versions can capture desktop audio or application audio with macOS audio capture sources. On older setups, extra routing software may still be required.
How to Record Screen and Webcam at the Same Time
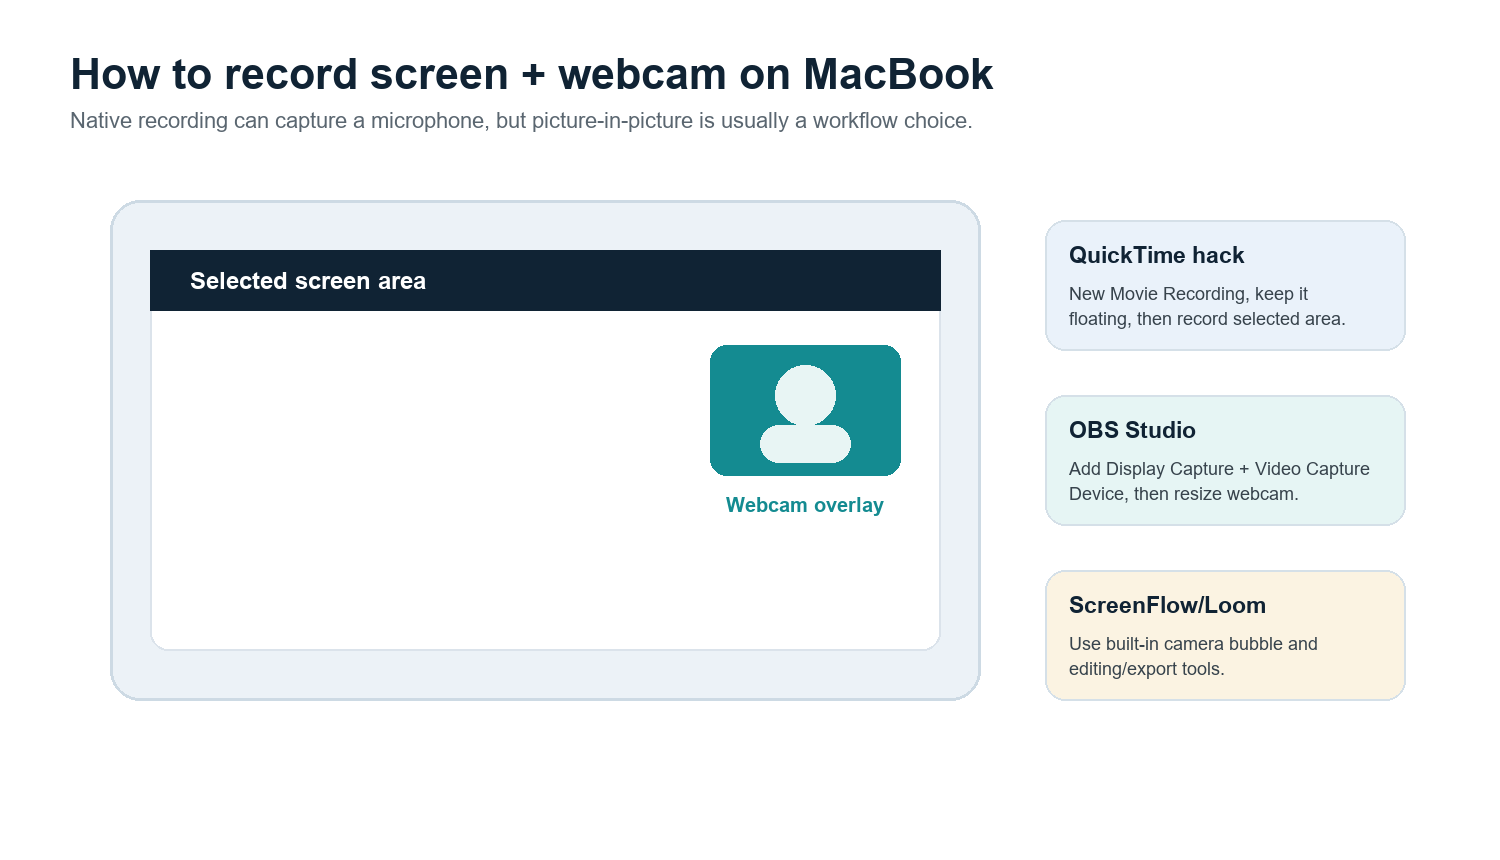
The native Screenshot toolbar does not offer a polished picture-in-picture camera bubble by itself. For quick work, open QuickTime Player, choose File > New Movie Recording, keep that camera window visible, then record a selected portion of the screen that includes both the app and the camera window. It is a workaround, not a full editing workflow.
Use OBS when you want a free, flexible camera overlay and precise placement.
Use Loom when the goal is fast cloud sharing with a webcam bubble.
Use ScreenFlow when you want recording, editing, callouts, captions, and export presets in one paid Mac app.
Use CleanShot X when you want a polished Mac utility for quick captures, annotations, and lightweight recordings.
Record a Specific App, Window, iPhone, or iPad
Only record one app window
With the built-in recorder, the most reliable approach is Record Selected Portion. Resize the rectangle around the target app. If you need true application capture that follows a window or excludes other apps, OBS is usually a better fit because it can use window or application capture modes depending on macOS and OBS version.
Record an iPhone or iPad screen
Connect the device to the MacBook with a cable, open QuickTime Player, choose File > New Movie Recording, open the capture-device menu, and select the connected iPhone or iPad as the camera source. Apple documents this QuickTime workflow for capturing what appears on a connected device and saving it as a movie on the Mac.
Schedule or time a recording
The built-in toolbar has a short timer, which is useful when you need a clean start. For true scheduled recording, use a dedicated recorder or automation setup. Test sleep settings, notifications, storage space, and audio routing first; a scheduled recording is only useful if the Mac stays awake and the input remains selected.
MOV to MP4, Compression, Editing, and Captions
Convert MOV to MP4
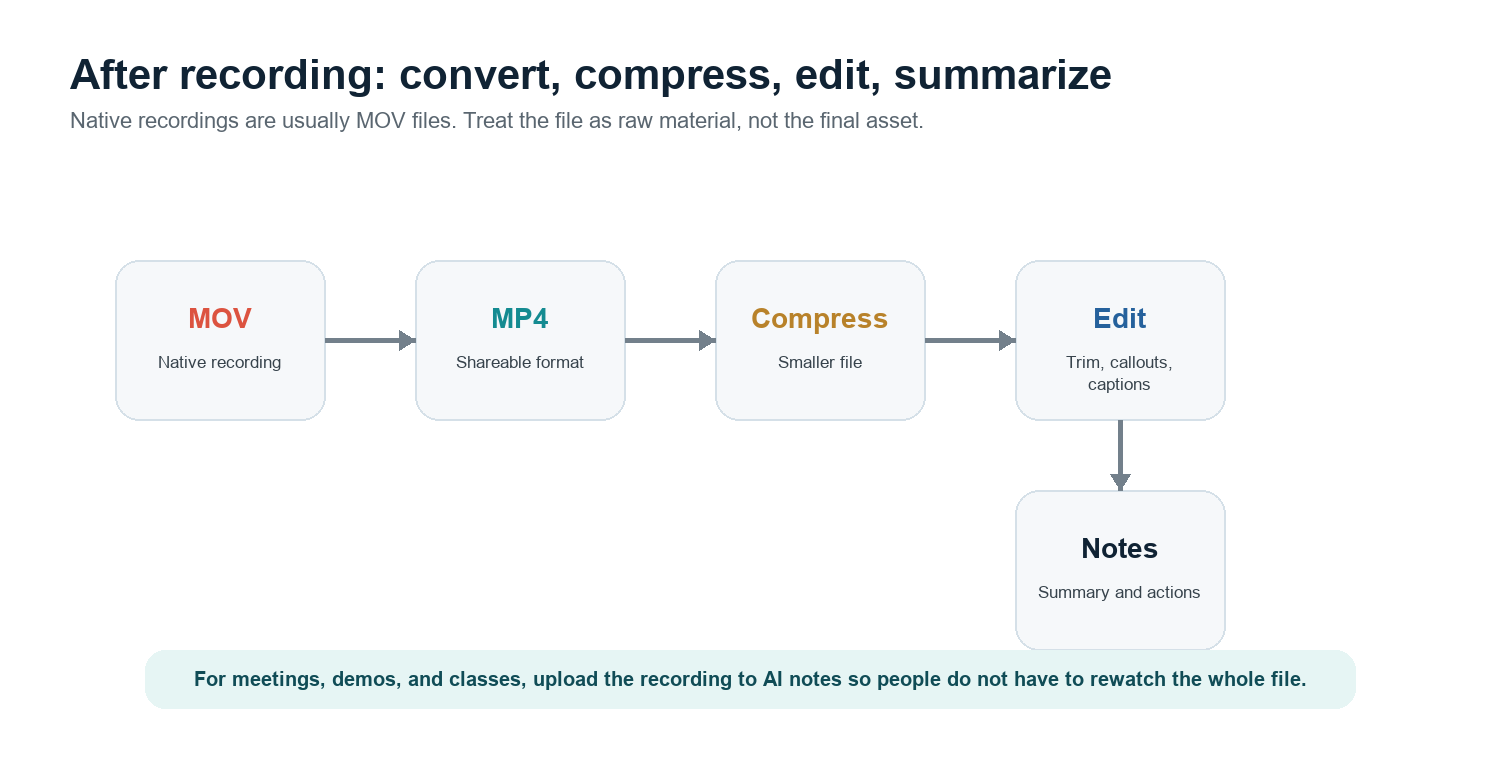
MacBook screen recordings usually save as MOV. Many platforms accept MOV, but MP4 is safer for cross-platform sharing. The simplest path is to open the file in QuickTime and export a lower-resolution version if the original is too large. For a true MP4 file, use iMovie, Compressor, HandBrake, or your video editor's H.264 MP4 export. Keep the original MOV until the MP4 has been checked.
Compress huge recordings
Record only the area you need, not the whole display.
Use 1080p export unless the viewer needs 4K detail.
Trim dead time at the beginning and end before compressing.
For tutorials, keep text large on screen so compression does not ruin readability.
Edit, add callouts, or create captions
QuickTime can trim, split, rearrange clips, and export, but it is basic. ScreenFlow is stronger for callouts, cursor emphasis, multi-track editing, and captions. OBS is stronger at capture than editing. Loom is convenient for sharing and quick comments. If the recording is a meeting, class, demo, or customer interview, the most useful post-processing may be a summary, transcript, and action list rather than a polished edit.
For that workflow, upload the recording to HiNoter AI Meeting Notes or let HiNoter AI Meeting Assistant auto-join scheduled calls. HiNoter can turn meetings, videos, and PDFs into summaries, action items, mind maps, and source-linked answers through AI Chat, so the recording becomes usable knowledge instead of another file nobody replays.
Third-Party MacBook Screen Recorders Compared
Tool | Best for | Strength | Watch out for |
Built-in Screenshot / QuickTime | Fast native recording | No install; good for simple screen and mic recording | No native system audio routing or polished webcam overlay |
OBS Studio | Free professional capture | Scenes, webcam, audio control, streaming, application capture | More setup and fewer built-in editing tools |
Loom | Fast sharing and async demos | Webcam bubble, cloud link, team comments | Cloud workflow may not fit sensitive recordings |
ScreenFlow | Paid Mac tutorial production | Capture plus editor, callouts, captions, MP4 export | Higher cost; heavier than a quick recorder |
CleanShot X | Polished Mac captures | Fast capture, annotation, and lightweight recording workflow | Not a full video editor |
Troubleshooting: No Sound, Black Screen, Huge Files
Problem | Likely cause | Fix |
No voice audio | No microphone selected in Options | Press Cmd+Shift+5 > Options > Microphone, then test a short clip. |
No internal audio | Native recorder is not capturing system audio | Use OBS on supported macOS or route audio with BlackHole/Loopback/VB-CABLE. |
Black screen on Netflix or streaming video | DRM protection prevents capture | This is expected behavior, not a broken Mac. Do not bypass DRM or platform rules. |
Only recorded the wrong window | Full-screen capture or wrong selected area | Use Record Selected Portion and frame only the app, or use OBS window/application capture. |
File is too large | Long recording, high resolution, or maximum-quality capture | Trim, export 1080p, compress to H.264 MP4, and avoid recording unused screen area. |
Webcam overlay missing | Native toolbar does not create PiP | Use QuickTime camera window workaround, OBS scenes, Loom, or ScreenFlow. |
M1/M2/M3 vs Intel confusion | Different chip, same basic macOS workflow | Cmd+Shift+5 and QuickTime steps are the same; third-party drivers must support your chip and macOS version. |
DRM note: If a streaming app records as a black screen, that usually means the service blocks capture for copyright protection. The right fix is to use permitted downloads, official sharing options, or your own licensed source material, not a screen-recording workaround. |
Best Workflow by Use Case
Use case | Recommended workflow |
Quick bug report | Cmd+Shift+5 > Record Selected Portion > microphone off or on as needed. |
Tutorial with your face | OBS for free PiP control, or ScreenFlow/Loom for a simpler polished workflow. |
Meeting you do not want to rewatch | Let HiNoter auto-join or upload the recording after the call for notes and action items. |
App demo with system audio | OBS on macOS 13+ if supported, or BlackHole routing plus a short test recording. |
iPhone app walkthrough | QuickTime > New Movie Recording > choose connected iPhone or iPad. |
Public training video | Record clean screen area, edit in ScreenFlow or similar, export MP4, add captions. |
FAQ
How do I screen record on a MacBook?
Press Cmd+Shift+5, choose Record Entire Screen or Record Selected Portion, click Options to set microphone and save location, click Record, then stop from the menu bar.
Can MacBook screen recording capture internal audio?
The built-in recorder can record a microphone, but internal system audio usually requires routing through a virtual audio driver such as BlackHole or using OBS Studio on supported macOS versions.
How do I screen record on MacBook Pro with audio?
Use Cmd+Shift+5 and choose a microphone under Options for narration. For app audio, use OBS or route the system sound through BlackHole or a similar tool.
Why is my Mac screen recording black?
Some streaming or protected video apps block recording through DRM. A black recording in those apps is expected behavior, not a hardware failure.
Does screen recording differ on M1, M2, M3, and Intel MacBooks?
The native Cmd+Shift+5 and QuickTime steps are essentially the same. Differences mainly appear in performance, battery life, and whether third-party drivers or recorders support your macOS version and chip.
How do I convert a Mac screen recording to MP4?
Export from iMovie, Compressor, HandBrake, ScreenFlow, or another editor using H.264 MP4. QuickTime can export smaller versions, but it commonly keeps the MOV container.